ARCHIVED: Use an SFTP program to change file permissions on Webserve
This content has been archived, and is no longer maintained by Indiana University. Information here may no longer be accurate, and links may no longer be available or reliable.
Some SFTP programs with a graphical user interface allow you to change Unix file permissions. Below are instructions for how to do this with the SFTP programs in common use at Indiana University.
On this page:
Change file permissions with Cyberduck (for Mac)
- Log into your web account using Cyberduck.
- Once connected, move into the directory where your files reside. For example, if you want to change the file permissions of the
index.htmlfile in yourwwwdirectory, click the triangle next to thewwwfolder. This will open thewwwfolder and display the files and subfolders within it.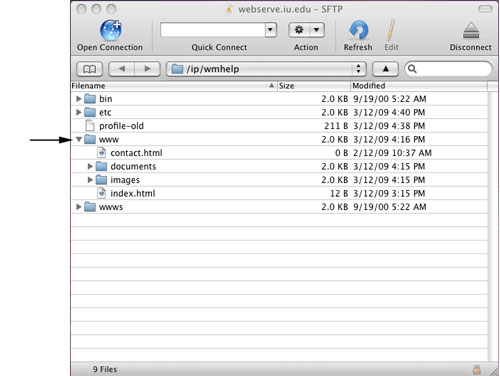
- Once you have found the file or folder whose permissions you wish to change, right-click (or, for one-button mouse users, hold down the
Ctrlkey and click) the file or folder name. This will launch a menu. Select .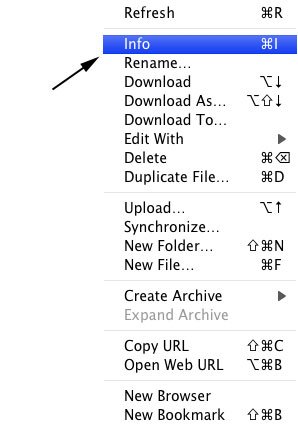
- If the Permissions section is not displayed, click the triangle next to "Permissions" to view the permission settings. To change the permissions, click the checkboxes. To make a page viewable on the web, make sure the boxes for Owner, Group, and Others all have and selected. The checkbox should be checked only for the Owner, and not for Group or Others.
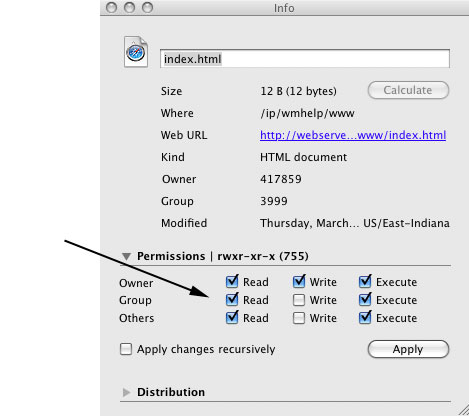 Note:On Webserve, permissions for files with
.php,.php4,.pl, and.cgiextensions should be set so that the checkboxes selected are , , and only for Owner. Group and Others should have no checkboxes selected. These are special files that require different permissions than standard html/shtml web files. - Click . Now check to see whether the page is viewable on the web; you may need to refresh your browser.
Change file permissions with WinSCP (for Windows)
- Log into your web account using WinSCP.
- Move into the directory where your files reside by double-clicking the folder in the right pane. For example, if you want to change the file permissions of a file in your
wwwdirectory, double-click thewwwfolder to open it. - To change the permissions, right-click the file name (for example,
index.html) or folder whose permissions you wish to set. A pop-up menu window will open. Select .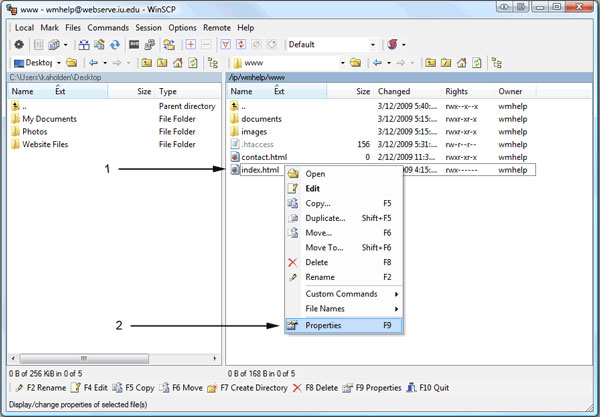
- The "Properties" window for the selected file will open. To change the permissions, you can either select the "Permissions:" checkboxes or edit the "Octal:" text field. Both the checkboxes and "Octal:" text field are synchronized, and a change in one area will be reflected in the other.
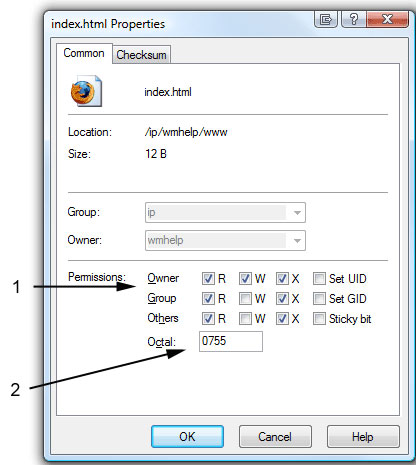
To make the file viewable on the web, in the "Permissions" section of the "Properties" window, for Owner check (for read), (for write), and (for execute). For Group and Others, check and . Alternatively, you could type
0755in the "Octal:" text field.Note:On Webserve, permissions for files with.php,.php4,.pl,.cgiextensions should be set so that the only checkboxes selected are , , for Owner (Octal =0700). These are special files that require different permissions than standard html/shtml web files. - Click . Now check to see whether the page is viewable on the web; you may need to refresh your browser.
This is document amkz in the Knowledge Base.
Last modified on 2021-09-08 10:19:10.