ARCHIVED: At IUB, using Photoshop, how do I send a print job to a plotter in the Wells Library?
Note: Printing to the plotters in the Wells Library at Indiana University Bloomington costs $10 per plot, and is recorded on your Student Technology Center (STC) printing allotment pages as "Color Printing". If your account is not linked to the bursar, you will need to add credit to your account before you can print. You can add credit at the Support Center walk-in desk in the Wells Library; otherwise, your color printing charges will appear on your bursar account shortly after the end of the semester.
To send a print job to the plotter from Photoshop in the Wells Library, first add the plotter of your choice to the computer that you are using; see ARCHIVED: In the IUB STCs, how do I choose a printer other than the default? If necessary, you can also follow the instructions below to add the plotter to an STC computer.
On this page:
Adding printers to Windows STCs
- From the menu, choose , and then . Select .
- Click and choose .
- Click , and then choose
.
Note: Do not select ; this will not allow you to select any of the plotters.
- Click , and choose one of the
following:
- Plotterprt: Matte paper
- Plotter2prt: Glossy paper
- Plotter3prt: Matte paper (main matte plotter during busy printing times)
- Click . Your printer's installation progress will be displayed at the bottom of the IU Printer Finder.
After installing the correct printer, open the document that you want to print in Photoshop; from the menu, choose .
Page setup for Windows
- A printer dialog box will appear in which you can select the plotter ( and for matte, or for glossy).
- Click ; you will sometimes have to click more than once before the next dialog box will load. From here, you will need to configure the paper size.
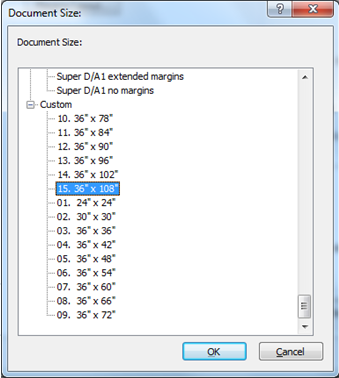
- Click the tab. Under "Document size", click
. Scroll down to the bottom of the list, and then select
a measurement that is 36" by at least the height of your job; see
below.
Note: The paper can be longer than your job, but this will result in wasted paper.
- Click three times to return to the print dialog box.
- The preview box should reflect what you want your printout to look
like; you may want to click .
Note: Clicking may cause the image size to change.
- Click twice.
After you have sent your job to the plotter, you will need to release it at the station by the consultant stations. (It is common for the screen to appear to freeze once you click your job; this is due to the size of plotter jobs.) You will then need to ask one of the consultants to release it as well.
Page setup for a Mac
- A printer dialog box will appear in which you can select the
plotter.
Note: Plotter 3 is not available on Macs.
- Click . From here, you will need to set up the paper size.
- Next to "Format For", select a plotter.
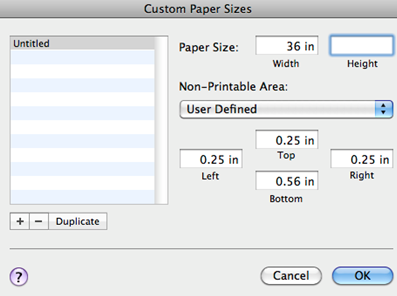
- Next to "Paper Size", select .
- A
Custom Paper Sizesdialog box will appear (as shown below). Click the (plus sign) located on the left side of the box. For "Width", enter36. For "Height", enter the other length of your document. It cannot exceed 108". - Click twice.
- The preview box should reflect what you want your printout to look
like; you may want to click .
Note: Clicking may cause the image size to change.
- Click twice.
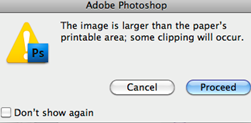
Note: If you receive an error like the one below, click .
After you have sent your job to the plotter, you will need to release it at the station by the consultant stations. (It is common for the screen to appear to freeze once you click your job; this is due to the size of plotter jobs.) You will then need to ask one of the consultants to release it as well.
This is document atqc in the Knowledge Base.
Last modified on 2018-01-18 15:42:26.


