Convert a physical or non-II system into an Intelligent Infrastructure virtual machine (P2V/V2V)
System conversion steps
Note:
Before performing a conversion, you will need to contact the Storage and Virtualization team to prep the environment for the conversion. To do this, navigate to IU Intelligent Infrastructure, and select . Be sure to include the following:
- VM name:
- Owner email (Active Directory group email):
- VLAN:
- Usage:
- Backups:
- Organization the VM will belong to:
- vRA resource pool:
SAV will inform you when permissions are set for you to perform the conversion.
- On the system you wish to migrate, download and install the latest copy of the VMware vCenter Converter.
Note:Unless otherwise indicated by the SAV team, select , not .
- Shut down all of your application services and any server services such as IIS and SQL Server.
- Right-click the VMware vCenter Converter Standalone shortcut, select , and specify local administrator. Ensure you are running as the primary built-in local administrator; even running as an ADS user who is an administrator on the system may cause issues.
- To begin a conversion, click .
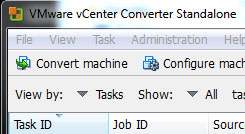
- Source system: Select the source system to convert.
- Destination system:
- Destination type: VMware Infrastructure virtual machine
- Server:
vc2.iu.edu - Username:
ads\usernameNote:This user should be a member of the ADS admin group that you specified in the VM request who has access to perform the P2V. - Password: IU ADS passphrase
- Destination virtual machine:
- To help keep billing records in sync, be sure to name your machine with the identical name that you used in the virtual machine request form
- If you are converting to the IU Indianapolis campus, select the folder.
- If you are converting to the IU Bloomington campus, select the folder.
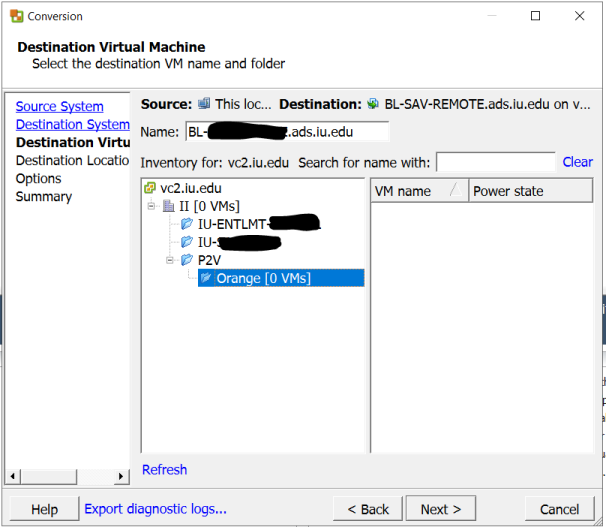
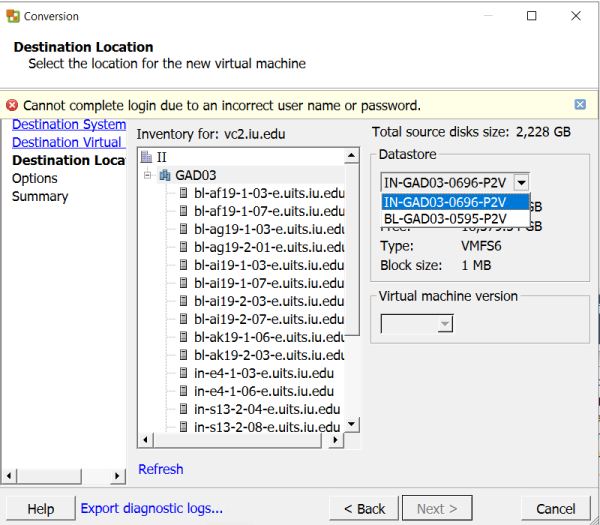
- Destination location:
- Click the P2V resource pool.
Note:This step is important to ensure that you have the permission to successfully perform the conversion.
- For ICTC:
- For IUDC:
- Datastore: Select the P2V datastore, not one of the isoimages.
- Host: You can leave the default host.
- Virtual machine version: Verify the newest (that is, highest number) version is selected.
- Click the P2V resource pool.
- Options:
- If your physical hard disk is larger than the space you requested, reduce the size to what you requested:
- Click next to "Data to copy".
- Next to the disk you want to reduce, under , choose to resize the VM hard disk down to the size you requested.
- To give the VM the correct NIC type, number of NICs, and ensure that they are allocated to the correct VLANs:
- Click next to "Networks".
- Adjust the number of NICs and what network they connect on (your VLAN) as necessary.
- Change the controller type for all NICs to for best performance, reliability, and supportability.
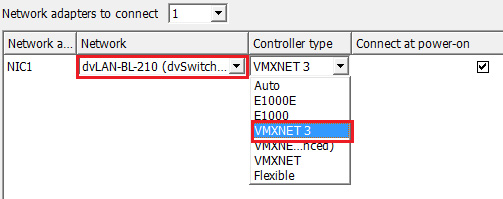
- If you are converting a Windows system, you should be able to leave the rest of the settings on this screen as default.
- If you are converting a powered-on Linux system, to
ensure that the VM data copy takes place, do the following:
- Set network adapter 1 to a VLAN that can communicate back to the original source system.
- See previous step on how to update NIC "Networks".
- If this needs to be different than the eventual destination VLAN, proceed with the change. You can reset it to the proper VLAN once the conversion process is complete.
- Select at the bottom of the "Options" list.
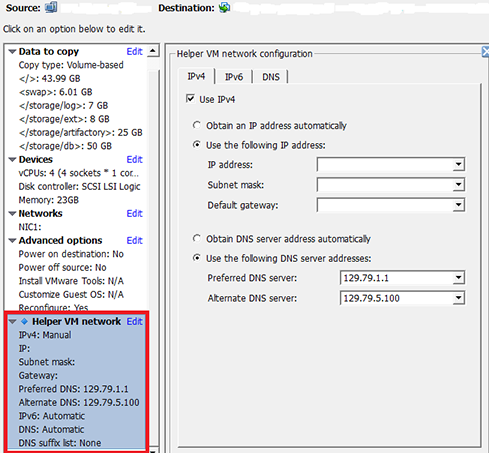
- Since most II VLANs do not support DHCP, you will likely need to provide a static (unused) IP that is valid for the specified VLAN so the helper VM can communicate back to the source system and copy data.
- Make sure that the source system's security and firewalls will allow SSH connections from the specified IP.
- For more about the helper VM, see the VMware Converter User's Guide.
- Set network adapter 1 to a VLAN that can communicate back to the original source system.
- If your physical hard disk is larger than the space you requested, reduce the size to what you requested:
- Summary: Verify settings and click .
Note:If you get an SSL error when trying to submit your job, attempt to resubmit the job, and it should go through. (See step 11 below.)
- Once the conversion has completed, you should be able to log into vSphere and see your VM in the folder you converted it to.
- If for any reason the VM conversion fails/errors, you will not be able to directly replace the first attempt. You will need to use a slightly different name (perhaps adding
_2at the end). SAV can then come in the next day, remove the erred VM, rename the successful one, and perform any other cleanup that needs to be done. - If you continue to have problems, see Support resources for IU Intelligent Infrastructure and storage and virtualization.
- If for any reason the VM conversion fails/errors, you will not be able to directly replace the first attempt. You will need to use a slightly different name (perhaps adding
- Install the VMware Tools: You will need to perform this step before you can see the network adapter. For details, refer to step 9 in Start an OS install on a virtual machine using Intelligent Infrastructure.
- Respond to your ticket and let SAV know the conversion is complete.
This is document ansi in the Knowledge Base.
Last modified on 2024-04-17 10:51:54.