Interact with a VM on the Infrastructure (II) self-service portal
- Log into the II self-service portal; see Access the Intelligent Infrastructure self-service portal.
- If prompted, select .
- From the tab, select .
- In the list, find the name of the virtual machine (VM) you wish to interact with. Use the search field to narrow down the list to the specific VM.
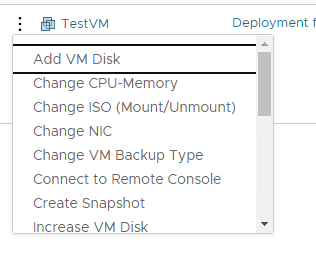
- Select the vertical ellipsis icon (
 ) next to the VM name, and then select the action you wish to perform on the VM.
 Note:The required fields for each action will differ. is outlined in the example below.
 - Follow the prompts to enter any required values.
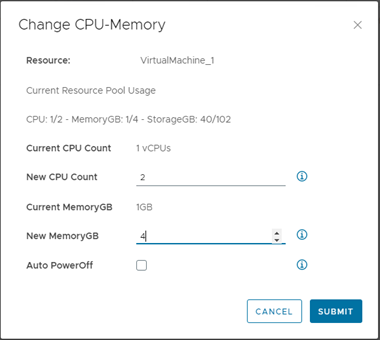
- In this example, we are changing the CPUs from 1 to 2 and memory from 1 GB to 4 GB.
- Since this action lets you change the amount of pool resources, a line showing current and maximum usage for CPU, memory (in GB), and disk (in GB) displays on the form for reference.
- This action requires powering off the VM, or else the values won't change successfully. Select to have the self-service portal power down the VM.
Important:- If a pool is over quota on any resource (for example, memory), requests to alter any resource (for example, CPU) will fail until you expand the available resources.
- You should periodically determine remaining resources in an Intelligent Infrastructure (II) resource pool.

- Select to immediately initiate the request. You will see the request working.

- To see the status of the request, select .
- If the task succeeded, the status bar will disappear.

- If the request failed, you will see a failed message. In the following example, the VM was not powered down before attempting to change CPU/memory amounts.

- If the task succeeded, the status bar will disappear.
This is document aoql in the Knowledge Base.
Last modified on 2023-05-04 10:18:45.