Add a skirt to an IU Web Framework site
On this page:
Overview
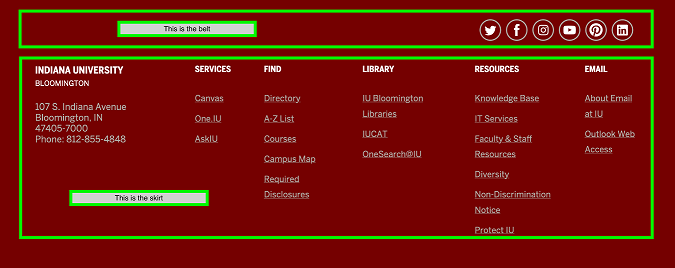
The IU Web Framework allows website developers to add a custom skirt to their website created with IU's Web Content Management System (WCMS).
The skirt is an area of a website's footer that sits below the belt. As a website developer, you can use this space to display additional navigation, contact information, or supplemental links.

Developers need manager access to any site to which they want to add a skirt. An IU Web Framework site's owner can give a developer manager access via the WCMS Manager Tools.
The instructions below assume you are familiar with writing HTML, using CSS, and editing templates in Cascade CMS. To learn more, see Hannon Hill's documentation on Templates.
Skirt makeup
A skirt is made up of the following two parts:
- A line of code added to the
Page - Standardtemplate - A page asset containing the skirt's HTML content
Create a skirt
The following instructions explain how a website's developer can add a custom skirt to an IU Web Framework site.
1. Add a placeholder for the skirt to the standard page template
- Open the standard page template located at
_internal/templates/Page - Standard. To open the template editor, click the tab near the top right. - Find the line of template code that contains the following (usually on or around line 37):
<include action="show" name="belt"/>Add the following line of code after the line listed above:
<include action="show" name="skirt"/> - Save your changes. Your updated
Page - Standardtemplate code should look similar to the code shown below:...snip... <system-region name="FEED"/> <system-region name="HIERARCHY"/> <include action="show" name="belt"/> <include action="show" name="skirt"/> <include action="show" name="footer"/> ...snip...
2. Create a default Cascade CMS page to contain your skirt's HTML content
Open the _includes folder. If the folder doesn't already contain a page asset called skirt, you'll need to create one. To do so, go to and then select the page type.
skirt, all lowercase. Capitalizing all or part of the name may cause PHP warnings.
3. Add your skirt's HTML content to the newly created page
- Open the newly created
skirtpage and then, near the top right, select the tab. - Scroll down to the WYSIWYG editor for the page's content and click the button to open the HTML editor:

- Enter your skirt's HTML content into the editor using the template below as a starting point:
<div
  aria-label="Additional links and resources"
  class="section bg-mahogany bg-dark skirt"
  role="complementary"
>
  <div class="row pad">
    <h2 class="show-for-sr">Additional links and resources</h2>
    <div class="skirt-nav">
      <!-- Your skirt HTML content goes here. -->
    </div>
  </div>
</div>
Don't put any HTML before or after the outermost
<div>element with the.sectionclass.If you wish, use the CSS grid classes provided by the IU Web Framework to lay out the different areas of your website's skirt. Your skirt's HTML content will inherit any of the IU Web Framework's styles for elements like headings, links, lists, and buttons.
- When you're finished writing your skirt's HTML content, save your changes.
Accessibility requirements
The outermost <div> must have an aria-label attribute that describes the content of your skirt, such as Additional links and resources. It must also have a role attribute set to complementary.
The first element of the <div> with the .row .pad classes must be an <h2> with the .show-for-sr class and header text identical to the value of the aria-label attribute.
The template code above meets these requirements.
4. Republish your site
You'll need to republish your entire site before the skirt will appear.
_includes/skirt file when you make changes to it.
This is document aumw in the Knowledge Base.
Last modified on 2023-07-17 14:53:59.