Collect payments with FireForm
On this page:
- Overview
- Set up a payment collection configuration
- Add payment collection to your form
- Example payment collection form
- Promo Code Report
- Get help
Overview
You can use FireForm to set up a form to collect payments through IU FlexPay. You will need FlexPay access prior to completing the payment collection configuration; submit the FlexPay Access Request form if you have not already done so. You will be provided with the needed information and next steps.
Set up a payment collection configuration
You will need to set up a form to collect payments before adding a payment collection configuration. See Build forms using FireForm for general instructions on creating forms.
To set up a payment collection configuration:
- In the Admin tenant dashboard, go to and select . You will see a page displaying all defined payment configurations.
- Select .
- Set the appropriate options:
- Accept Payment: Check the box to activate the payment configuration.
- Form: Select the form you want to use to collect payments.
- RPAQ ID Number: Enter an RPAQ ID number. If you don't know your RPAQ number, email Treasury Operations at
rprm@iu.edu. - Cost: Enter the base amount to be collected (may be $0).
- Dependency Setting: Select a FlexPay dependency setting.
- Payment Options: Select at least one payment option. Available options change with the selected dependency setting, and some require you to enter additional information in fields that will appear. Options include:
- Credit Card (for Payment Screen Text, include your Refund Policy)
- Bursar (additional information required)
- CrimsonCash (Gold Location number required)
- Dept Billing (additional information required)
- Invoice
- I-BUCKS (FireForm system admin must give permission for this functionality; submit a FireForm Support Request)
- Item Sale Options:
- Pickup: You will be prompted to enter an optional pickup message.
- Delivery: You will need to define a delivery scale before choosing this option. You will also be prompted to enter an optional delivery message.
To define a delivery scale, from the Admin tenant view, go to and choose . Select and follow the prompts.
- Allow Promo Codes: You will need to define your promo code(s) before selecting this option. If checked, a list of available promo codes will display. Select the code that will be available for use on the form. For information on the Promo Code Report, see below.
To define a promo code:
- From the Admin tenant view, go to and choose .
- Select . Define the promo code attributes:
- Name: Use a descriptive name. This will display on the promo code listings page.
- Code: Characters that users will enter into a form for submission.
- Amount: Amount the code will deduct from the total. Note that if the promo code amount is equal to the total balance on the form, the user will not be passed through IUFlexPay to submit the form.
- Start Date: Date the code will become effective.
- End Date: Final date that the code will be effective. After this date, the code can't be used for form submissions.
- Form Limit: Number of times a code can be used for form submissions.
- User Limit: The number of times a specific user can use the code for form submissions.
- Status: Must be "active" for the code to be available to users. "Inactive" means the code will not be available for use on form submissions.
- Select .
- Justification Document: Attach a document describing the need for payment collection. The document must be in one of the following file formats:
.pdf,.doc,.docx,.jpg,.jpeg,.gif, or.png.
Add payment collection to your form
To add the payment functionality to the form, you will need to add an Element with a payment related data type (for example, Sale Item, Payment Basic, etc.). For details about these data types, see FireForm element data types and their functions.
Example payment collection form
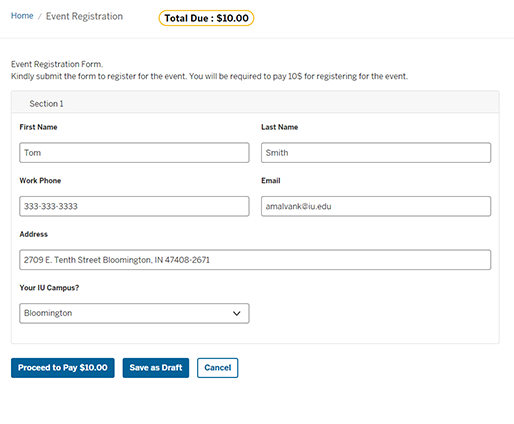
Following is an example of how a payment collection form appears to users:

Note the "Total Due" at the top, indicating the amount the user is required to pay.
With regular forms, the user submits the form by selecting . When payment collection is enabled, this button instead reads .
Promo Code Report
The Promo Code Report displays promo codes when they have been used. To view the report, navigate to . Filters are available at the top of the report. You can also sort the report by column.
Get help
If you have additional questions, need to report a bug, or would like to make enhancement requests for the FireForm system, submit a FireForm Support Request.
Related documents
This is document bfnm in the Knowledge Base.
Last modified on 2023-03-21 14:45:00.