Search for students in AdRx
On this page:
Search for an individual student
Authorized users can search Advising Records (AdRx) for individual students by using their name, username, or University ID.
Go to AdRx, click , and follow any login prompts.
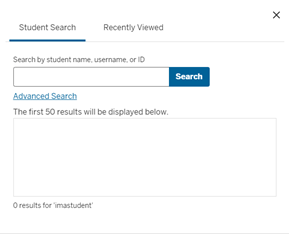
- On the AdRx landing page, in the header, click . You'll see a basic search bar on the tab:

- In the search bar, enter the student's University ID, username, or name.
If you're searching by name, use one of the following formats:
- First name/last name
- Last name/first name
- Last name only
- First letter of first name and last name
- First four letters of first name and last name
- Click . The first 50 search results will display below. Click a student's name to go to the "Student Summary" page of their AdRx record.
Students whose records you have viewed within the last seven days will appear on the tab, which you can access at the top of the search screen. Students will be listed based on the order in which you viewed them, with the most recently viewed at the top. The date and time you viewed the student's record will appear at the bottom of the ribbon.
Search for groups of students
Use All Students
The AdRx All students (formerly advanced search) page provides authorized users an extensive list of search parameters to find students who meet selected criteria. To find a group of students:
- On the AdRx landing page, in the header, click .
- From the tab, click the tab.
- Select from the following search parameters as desired:
- Campus/Career: These values are set by default based on your main AdRx profile. You may change them during an AdRx session, but they'll revert to their default values in your next AdRx session or if you click at the bottom of the page.
Note:Depending on the campus and/or career selected, some of the search parameters below will display only a subset of values.
- Action Items: This parameter returns students who have an active and/or completed action item. Use this search parameter along with the caseload parameter to find your caseload students who have been added to an action item by you or another user.
- Admit Term: Search by indicating an admit term campus, admit term career, and the term criteria.
- Advising Offices and Advisors: This parameter displays values relevant to the campus and career selected; it lists all offices and advisors (along with success coaches) assigned to students enrolled on your campus.
- Alerts: Search by Alerts (Low Early Evaluation or Current Grade, Negative SER feedback, Not enrolled full-time, Not met with advisor, Term withdrawn).
- Area of Study: This list of available majors, certificates, and minors (given the campus and career selected) also contains a search field to filter plans. Use the search field to filter the list of plans so that only those that match the entered term or phrase are displayed.
If you've selected multiple plans from the list:
- Use to return students with at least one of the plans selected, OR
- Use to return only students with all selected plans.
- Campaign: This parameter will return students who are in an active campaign, any of the campaigns you manage, or any active campaign not managed by you for the campus.
- Caseload: You may select either your assigned or custom-created caseloads as search parameters.
- Class Standing: Search by class standing at the beginning of a selected semester.
- Course Grades: Search for students based on their final grade in a current or prior enrolled course.
- Course Registration: Search for students based on their registration status for a given semester and course.
- Enrollment: This filter has parameters to identify students' enrollment history (both enrolled and not enrolled terms) as well as the last term a student was enrolled.
- GPA: This filter allows you to set a range of either cumulative or term GPA's, in which you can select a specific term.
- Graduation Review Status: This parameter has the values of program in review, program not in review, and not specified.
- Hours: This filter has two options: set a range of credit hours completed or set a range of credit hours for a campus and a specific term to see current enrollment.
- Service Indicators: The list of service indicators available is based on the default or selected campus.
- Student Engagement Roster: Search for students by current SER feedback, review status, submission date, and SER values within a specific course.
- Student Groups: The list of student groups available is based on the default or selected campus.
- Transfer Students: Search for external transfer students.
- Campus/Career: These values are set by default based on your main AdRx profile. You may change them during an AdRx session, but they'll revert to their default values in your next AdRx session or if you click at the bottom of the page.
- Once you've set all desired parameters, click at the top of the left panel in the "Selected Filters" details. A list of students matching the search parameters will be displayed.
- Above the resulting of students, there is displayed the total number of students fitting the criteria, the option to save the search (hyperlink to save query details below), a list of filters applied, an action you can take with the list, and how many students will show per page.
- Once you have your results, choose one of the following actions:
- To display the student's Information Workspace in AdRx, select the student's name. When you view a student's record this way, a secondary header displays and you can toggle between students in alphabetical order.
- To save the list of results as a comma-delimited (
.csv) file, click and a file will download that includes name, UID, username, email address, phone numbers, assigned advisors or offices, and program/plan, along with columns of information for each filter used. - To save the results as an ad hoc caseload, click . In the "Add Students to Adhoc Caseload Group" pop-up, enter a new caseload name and click . Alternatively, select , select from a drop-down menu of your current ad hoc groups, and then click .
- To push your results to a campaign:
- In the header, click .
- Select the tab.
- Set your criteria and click .
- Once your query returns results, select .
- Select a campaign from the "Push Students To Campaign" pop-up. When the students have been added to your campaign, you will see on-screen confirmation listing the number of students added.
- Click the to close the pop-up.
- In the header, click to return to the "Campaigns" home page.
- To send an email to all students in a search results list and save as an AdRx note:
- Click .
- Follow the "Add a new contact note" instructions to leave only a note on all the students record.
- To send an email, complete all steps to leave a contact note, but do not submit it. Check “Email Advising comments to student”.
- Select who the email will come from (either you or
no-reply@iu.edu), anyone you want to CC on the email, and the subject of the email. - When ready, click .
- To display the student's Information Workspace in AdRx, select the student's name. When you view a student's record this way, a secondary header displays and you can toggle between students in alphabetical order.
Go to AdRx, click , and follow any login prompts.
Save a search query
AdRx allows you to save search queries so that you can quickly perform the same search again without having to reselect the parameters. To save a search query:
- Perform an advanced search and view your list of results.
- At the top of the results page, click .
- In the "Save Search" dialog box, enter a name for the search and click .
- Close the dialog box.
Access and apply a saved search
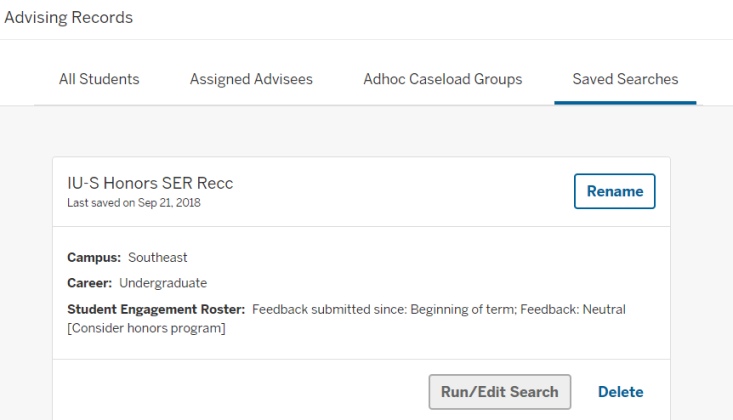
To access a saved search, click the tab from within Caseload.
Each saved search will display in date order, with the oldest being at the top. The name, campus, career, and any filters used will be shown. Options to rename, run/edit a search, or delete are also available from .

This is document bhix in the Knowledge Base.
Last modified on 2023-07-24 13:15:05.
