Run the accessibility checker in Microsoft Word
On this page:
Overview
Running the Accessibility Checker in Microsoft Word is an essential step in ensuring a document is fully accessible. Using the Accessibility Checker, you can see what elements of your document need attention to make them accessible to all users.
Run the Accessibility Checker
To run the Accessibility Checker:
- On the ribbon, select the tab.
- Select , and then select .
Note:In the Microsoft 365 version of Word, you can also access the Accessibility Checker from the tab on the ribbon.
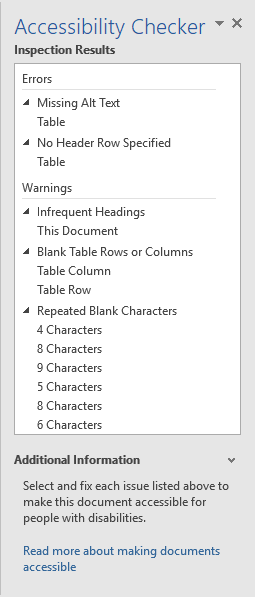
- The Accessibility Checker pane will open and display any issues with the document. From here, you can resolve any issues that appeared during the process of checking for accessibility.
Following is an example of what the Accessibility Checker might report as issues when checking the accessibility of a document:

Resolve accessibility issues
To resolve issues in the Accessibility Checker pane:
- Select the error listed in the Accessibility Checker pane to highlight it in the document.
- Follow the instructions for fixing the error in the bottom of the pane.
Common issues that may appear include:
- Descriptive hyperlinks missing
- Images missing alternative text
- Tables missing alternative text or header row
- White space created by adding space with the
Enterkey, instead of by using styles/formatting/indenting - Page breaks created by adding space with the
Enterkey, instead of inserting a proper page break
When all issues have been resolved, the Accessibility Checker pane will display a note indicating no accessibility issues have been found.
This is document aqju in the Knowledge Base.
Last modified on 2024-06-14 11:24:52.