ARCHIVED: Create collaborative workspaces with new Google Sites
On this page:
- Overview
- Create a new Google Site
- Create and add collaborators to a Google Group
- Share your Google Site with your Google Group
- Embed your Google Group discussion on a page in your site
- Create and share a calendar for your workspace
- Embed your shared calendar on a page in your site
- Share and embed other Google resources in your site
Overview
The new Google Sites tool offers non-programmers an interface for creating attractive, mobile-friendly websites. Follow the instructions here, in order, to use Google Sites with Google Groups and Google Calendar to create collaborative workspaces for groups.
1. Create a new Google Site
Using the new Google Sites tool, create the structure and content for your Google Site. For instructions on how to create, share, and publish sites, see Google's documentation for the new Google Sites.
2. Create and add collaborators to a Google Group
Google Groups combine the functionality of a traditional mailing list with an online discussion forum. You can also use them to share other types of Google resources with all members of the group, rather than sharing with individual users. The group you create for your collaborative workspace will serve both purposes.
For instructions on how to create and add members to your Google Group, see "Create a Google Group" and "Manage a Google Group" in Create, manage, and participate in Google Groups at IU.
3. Share your Google Site with your Google Group
Once you've added members to your Google Group, you can share the Google Site with the group. This will give all group members access to the site. Also, when you add members to or remove members from the group, they will gain or lose access to the site, respectively.
To share your Google Site with your Google Group:
- Make sure you have the email address for your Google Group (in the form
groupname-iu-group@iu.edu), which you'll need to be able to share the site with the group. If you don't know the address:- Navigate to the group by clicking the URL in your confirmation message, or by going to groups.google.com, locating the group in the list, and clicking the group name.
- In the left menu, click .
- The group's email address will display at the top of the "About" page. Write down your group's full address (in the format
your-group-name-iu-group@iu.edu).
- Navigate to the edit view of your Google Site.
- Click the icon (
 ).
). - In the "Invite People" field of the "Share with others" window, enter the email address for the group and select the desired level of access for group members (such as or ).
- If you want to add a personal message to the notification that will be sent to group members, click , and add your message.
- Click .
Your group members should now have access to your Google Site.
4. Embed a Google Group discussion on a page in your site
Once group members have access to your site, you can embed the threaded discussion interface for your group within a page in your Google Site. This will allow group members to read and participate in group discussions while visiting the site instead of having to navigate to the group to read and post.
To embed the discussion in your site:
- You'll need the full URL for your group, which takes the form
https://groups.google.com/a/iu.edu/g/your_group_name. To retrieve the URL:- Navigate to the group by clicking the URL in your confirmation message or by going to groups.google.com.
- Locate your group in the list, and click the group name.
- The URL for the group will display in the browser's address bar. Select the URL and copy it to the clipboard by pressing
Ctrl-c(Windows) orcmd-c(Mac).
- Navigate to the edit view of your Google Site.
- Click to view the current list of pages in your site, and click (plus sign) to add a new page.
- Give the new page a name (for example, "Team Discussion"), and then click . The new empty page should now display at the right.
- Click to display the insert options, and select .
- In the "Embed from web > web" pop-up, make sure is selected.
- In the URL field, press
Ctrl-v(Windows) orcmd-v(Mac) to paste the URL for the group, and then click . The discussion forum for your Google Group should now appear on the page. - Adjust the size of the embed box as needed by dragging the handles on the sides and bottom of the box.
5. Create and share a calendar for your workspace
To add a shared calendar to your collaborative workspace, begin by creating a Google Calendar and sharing it with your Google Group:
- Go to Google Calendar.
- On the left side, above "My calendars", click and then select .
- Add a name and description for your calendar, and click .
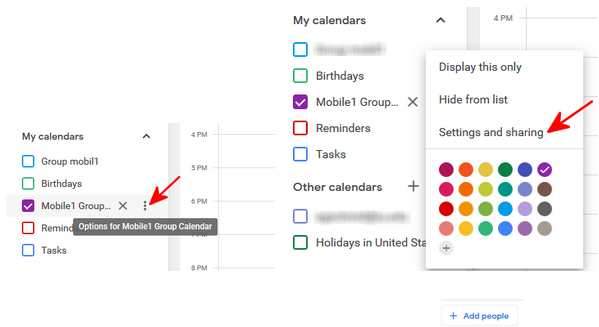
- Your new calendar will appear in the list of calendars on the left, below your personal calendar. Click the icon (
 ) next to the title of the new calendar, select , scroll down to , and then click :

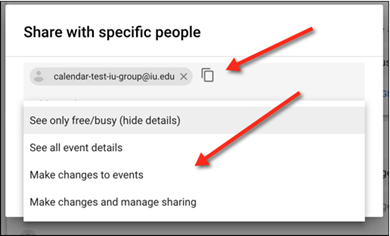
- In the "Add email or name" field, enter the email address of your Google Group, and then select the desired level of access for the group:

- Click to complete the action and notify group members.
6. Embed your shared calendar on a page in your site
To embed your shared calendar in your collaborative workspace:
- Navigate to the edit view of your Google Site.
- Click to view the current list of pages in your site, and click (plus sign) to add a new page.
- Give the new page a name (for example, "Team Calendar"), and then click . The new empty page should now display at the right.
- Click to display the insert options.
- In the list of options below the page layouts, click . A list of your calendars will display.
- Select the calendar you shared with your group and click . The calendar for your Google Group should now appear on the page.
- Adjust the size of the embed box as needed by dragging the handles on the sides and bottom of the box, and then click the gear to open the settings menu and customize the view of the calendar.
7. Share and embed other Google resources in your site
You can embed other types of Google resources (Google at IU My Drive folders, Google Docs, Blogger Blogs, etc.) using the same techniques you used to embed your Google Group and Google Calendar in the site. First, share the resource with your group, and then embed it on a page in the site using the either option or the options for inserting specific types of Google Resources (for example, Google Calendar, Google Maps, Google Docs, Google Forms, etc.).
This is document atvm in the Knowledge Base.
Last modified on 2023-11-14 11:36:42.