Share and collaborate on Microsoft 365 files
On this page:
Overview
Microsoft 365 at IU, which includes Microsoft OneDrive at IU, Microsoft Teams at IU, and Microsoft at IU Secure Storage, provides a simple, secure way to share and store files online. The sharing settings available in Microsoft 365 provide the ability to securely collaborate on files and folders.
-
Go to Microsoft 365 at IU .
-
If you see a "Sign in" prompt, enter your IU username followed by
@iu.edu(do this no matter what your email address is), and then, at the password prompt, enter your IU passphrase. (Do not select anything on the sign-in pages other than and .) When prompted, confirm your identity with Two-Step Login (Duo) (if you see a "Do you trust iu.edu" prompt, select ), and then choose whether to stay signed into your Microsoft 365 account. -
Above "Home", select the app launcher icon (
), and then select . This should allow you to access files in both Microsoft OneDrive at IU and in shared sites associated with Microsoft Teams and Microsoft Secure Storage. For more, see Options for storing files at IU.
When a new folder is created, it will be a private folder by default, as indicated by the "Sharing" column in the file/folder list online in OneDrive.
Shared folders
To navigate to content that you want to share, if you're sharing from your personal OneDrive, use the first method below; if you're sharing Microsoft Teams content, use any of the methods.
- Use OneDrive: Log into Microsoft 365 at IU , and then select the (cloud) icon. Navigate to the folder or file you want to share.
- Use Microsoft Teams: Open Microsoft Teams and navigate to the appropriate team. Open the channel containing the folder or file you want to share, and select the tab. On the action bar at the top, select .
- Use SharePoint: Navigate to indiana.sharepoint.com/_layouts/15/sharepoint.aspx and log in. Select the site that has the folder or file you want to share, and then select .
Note:You cannot share the
Documentsfolder directly (unless you grant access to the entire team; see the note above). You can only share subfolders or files within theDocumentsfolder.
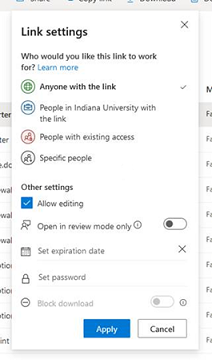
To share files and folders, select the file or folder that you want to share, and then select either or at the top of the page. Alternatively, hover over the file or folder, and then select the arrow icon. In the window that appears, by default, the option will be selected. To change this, select that option and select any of the following:
- : If you need to share the link with people outside of IU, this may be the best option, but you should only use it for data classified as Public data.
- : This option will generate a link without actually adding more collaborators.
- : This is the same as the default setting.
Once you've selected the desired options and/or entered email addresses, select if going through the option, or send the link to collaborators as needed if you copied an existing link.
When sharing a folder, under "Other Settings", you can also choose whether users with whom you have shared the folder can edit the folder and whether they are able to download the folder.
If you need even more granular permissions settings, select the level of sharing in the "Shared" column beside the name of the folder, and then select in the window that appears. If you see "Stop Inheriting Permissions" at the top (which will usually appear if the folder has not been shared yet), you will need to select it, and then select to enable the ability to grant more permissions.
To add permissions from here:
- select .
- In the window that appears, in the "Enter names and email addresses..." box, enter the username of the person with whom you want to share folders, and then select the user from the drop-down list. If sharing with an external user, enter the user's email address.
- Select , and then select the desired permission level. For more about the available permission levels, see Default permission levels.
- Select .
For more about sharing files and folders in OneDrive, see Share OneDrive files and folders.
Create a go.iu.edu link
If you have created a share link, and want to use go.iu.edu to provide a shorter URL:
- In the "Send link" dialog that appears after you select (see directions above for accessing sharing settings), select to copy the link to the clipboard.
- With the link in the clipboard, navigate to go.iu.edu and log in with your IU username and passphrase.
- In the "Long URL" box, paste the copied URL (
Ctrl-vin Windows,command-vin macOS, or right-click in the box and select ). Give the link a description, if desired. - Select . The shortened link details will appear.
Create a shared link with optional restrictions
In some cases, when sharing files externally via a link, you may want to configure additional security settings. To create a shared link with optional security restrictions:
- Select the three vertical dots beside the name of the file or folder, and then select .
- Select to reveal additional options.
- Under "Other settings", configure the settings as desired. For example, you can set a password for the link, set an expiration date for the link, or block downloading of the file (in other words, let the file be viewable only). Some of these options will only be available if you select and uncheck .

See who edited a file or folder
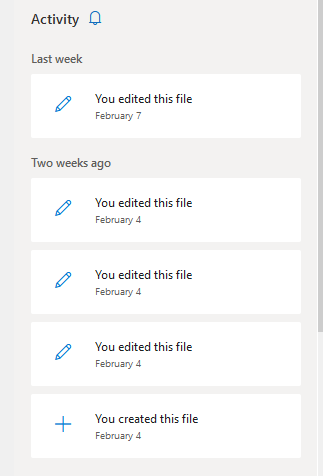
To view information about who has edited a file or folder:
- Select the three vertical dots beside the name of the file or folder, and then select .
- Under "Activity", you'll see recent activity for the file or folder.

This is document bdht in the Knowledge Base.
Last modified on 2024-06-05 12:36:40.