Kiosk management for advisors and coaches
On this page:
- Overview
- Monitor Kiosk check-ins
- Scheduled appointment student check-in
- Drop-in (unscheduled appointment) student check-in
- Guest check-in
- Absent or not seen drop-ins or guests
Overview
Kiosk is a check-in system that lets you track and manage students in a variety of settings. You can use two different kiosk types for check-in: Office Kiosk or Activity Kiosk. Two elements of this tool influence what the student sees when checking in/out and how staff manage events or appointments: queues and services.
- Queues are the groups a student is virtually placed into when they check in or sign in.
- Services are optional items that students without an appointment or students attending an event can choose from during the check-in process to provide supplemental information to managers and administrators.
The following information is intended for advisors and coaches working in an office that uses Kiosk. Front desk staff should be familiar with this information to assist with day-to-day issues, but it's primarily directed at staff who meet with students and need to move those students through AdRx.
Monitor Kiosk check-ins
When a student checks in for their scheduled appointment with you, a drop-in checks in, or a guest checks in at your kiosk, a visual indicator ( ) appears in the AdRx header next to the appointment icon (
 ). This indicator will appear when a student checks in and disappear when the student is claimed.
To view your AdRx "Appointments" page and clear the notification, click the appointment icon:
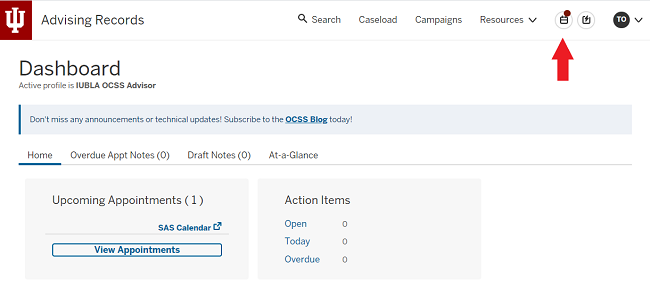
When you are on the "Appointments" page, you will see multiple tabs at the top. The first is your scheduled tab, followed by tabs each named for the kiosks you are assigned to. The drop-in and guest queues for each are broken into separate lists within each kiosk tab.

Scheduled appointment student check-in
The tab displays a count of students who have checked in for their SAS-scheduled appointment with you, as well as any drop-ins or guests you have claimed.
The student card also indicates the time of the check-in and any additional notes the student added during the check-in process.

Drop-in (unscheduled appointment) student check-in
A kiosk's tab will display a count of unclaimed students who checked in as drop-ins.
Claim a drop-in
To indicate that you can meet with a drop-in student:
- Click the kiosk name, then select , and then, in the student's appointment card, click .
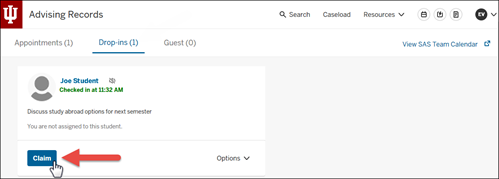
- The count on your tab increments to include claimed student(s), and the student's card moves from the queue on the kiosk's list to the queue on your tab in a section named "Drop-In" under your scheduled appointments.
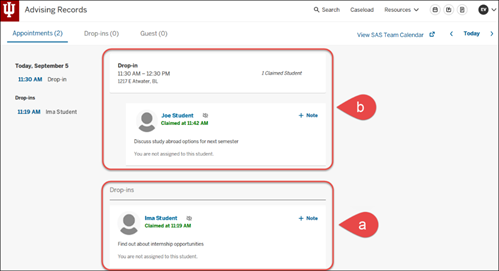
- The cards in each queue are updated automatically as students check in and are claimed or removed. If you are viewing a queue and another advisor claims a student, the card will display a message stating "Student cannot be claimed."
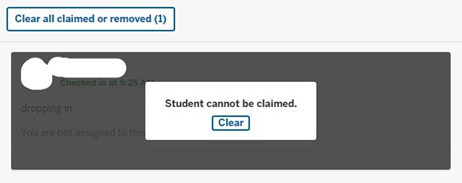
To clear all claimed/removed students and show an updated queue, click . Alternatively, to update the queue one student at a time and review each claimed/removed student, click within each student card.
- The tally on the , , and tabs is automatically adjusted to reflect new check-ins and when another advisor in your group claims a student. When the drop-in and/or guest queues are empty, the notification dots will clear for all advisors.
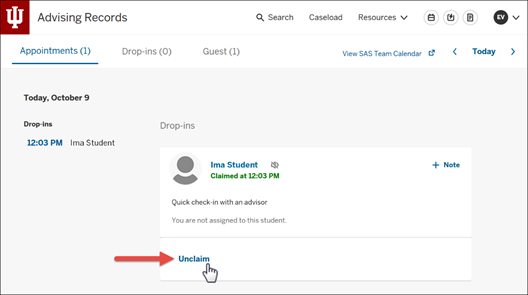
Unclaim a drop-in
If you are no longer able to meet with a claimed drop-in, click in the student's card to remove them from your queue and place them back into the main queue for someone else to claim.
Guest check-in
In a kiosk's list, you will see a count of visitors who have checked in as guests. The guest card includes the student's provided name, check-in time, reason for appointment (if provided), and provided contact information.
Claim a guest
To indicate that you can meet with a guest:
- Click the list, and then, in the student's appointment card, click .
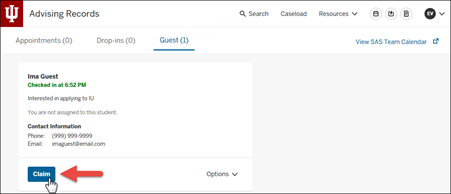
- The count on your tab count increments to include the claimed guest, and the student's card moves from the queue on the list to the queue on your tab.
Unclaim a guest
If you are no longer able to meet with a claimed guest, click in their card to remove them from your queue and place them back into the main queue for someone else to claim.
Absent or not seen drop-ins or guests
If a drop-in student or guest checked in was not seen for any reason, to mark their check-in accordingly and remove them from the queue:
- Find the card of the drop-in or guest and click .
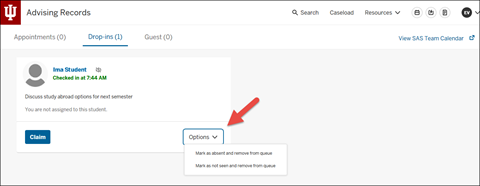
- From the drop-down menu that appears, select the appropriate option:
- The student or guest is removed from the queue.
If your office would like to follow up with a student or guest who was marked as absent or not seen, review the "Kiosk Reporting" section of the "Kiosk - Appointment Status Summary" Tableau report at ds.iu.edu.
This is document bgjs in the Knowledge Base.
Last modified on 2022-01-03 13:43:30.