Work in the AdRx Contact History page
On this page:
- Overview
- Access the Contact History page
- View related contact notes
- Filter contact notes
- Add an addendum (threaded notes)
Overview
The student's Contact History page allows authorized users to 1) view all AdRx advising contacts for the student, 2) only display related notes, 3) create an addendum to an existing contact record, and 4) manage saved contact note drafts.
Access the Contact History page
- Select the tab at the top of the page when viewing a student's AdRx record.
- All contact notes for this student are displayed in scrollable pages. Each row can be expanded to show the full details of the note.
View related contact notes
If you are searching for related contact records (for example, looking for an appointment note that was added to an appointment record), AdRx allows users to quickly locate this information by only displaying those related notes/records.
- Select the related notes link (for example, ) in the contact record. The page is now filtered to display only those related notes/records.
- Select (located above the filtered list) to return to full list.
Filter contact notes
Some notes are automatically hidden from the default list of contact notes. Specifically, you can view mass/group notes and SAS-generated notes by selecting the drop-down menu and unchecking either or .
The filter menu provides an easy way to find notes submitted by a certain AdRx user, by contact type, and by tags. Only the values that exist within the contact notes of that specific student are available to select. If you are looking for a note that should have a certain tag, but it's not in the list, that means it was not submitted with that tag. You can select multiple options for each type of filter.
You can also expand all contact notes, use the browser's find function (Ctrl-F), and search the text of all visible notes.
Add an addendum (threaded notes)
The AdRx application allows addenda to be placed on submitted contact notes. Addenda can only be created and viewed through the Contact History page. Also, it is not possible to add an addendum to an addendum.
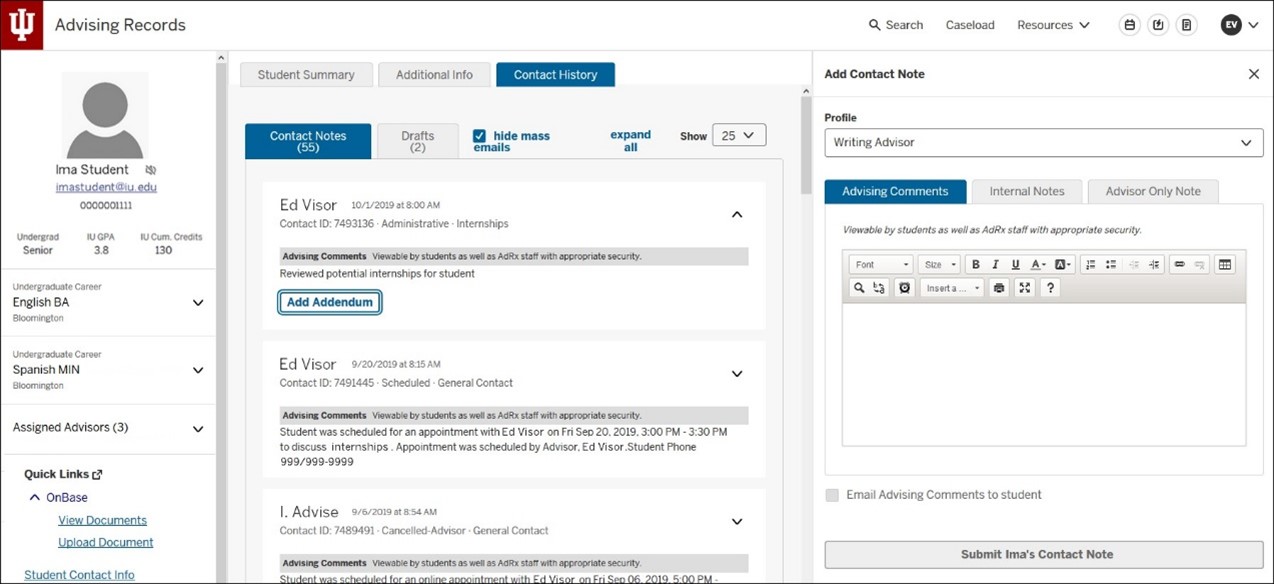
- To add an addendum to a contact note, in the Contact History page, expand the row, and then select . The "Add Contact Note" slide out appears.
(select image to enlarge)
- If you have multiple profiles in AdRx, verify or change the profile to use for the addendum (if you have only one profile, this field will not display).
- Select the appropriate note type for the addendum.
- Add your addendum comments. AdRx provides several editing tools within the comment area, including the ability to add quick notes that you have created.
- When ready to submit the addendum, select . The "Submit Contact Note" pop-up displays with a reminder that once the note/addendum is submitted, it cannot be edited.
- When you are ready to submit the addendum, select .
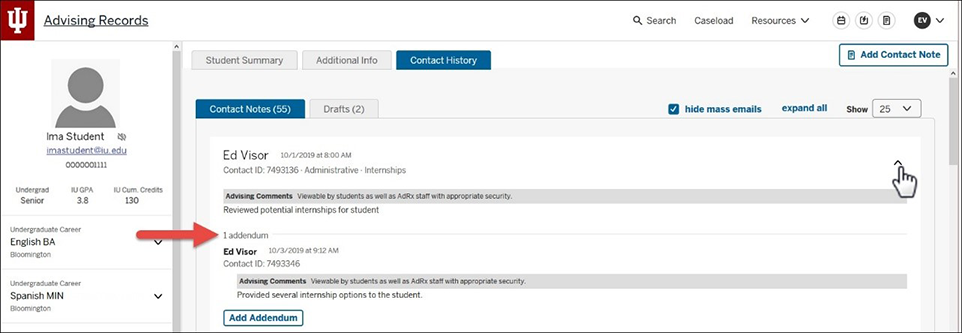
The addendum now displays under its contact note.
Notes with addenda display an addendum label with a count. Expand the row to view the addenda.
(select image to enlarge)
- Once an addendum has been submitted, it cannot be deleted. If a mistake was made, add a new addendum correcting the error.
- If the addendum was submitted for the wrong student, it can be inactivated. In the AdRx header under "Resources", the user or administrator should select .
This will open the OCSS Problem and Request form. Explain the situation so that the addendum can be inactivated. Include in the message the student's name, ID, and the contact ID number.
This is document bhkd in the Knowledge Base.
Last modified on 2024-06-12 15:11:12.

