Denodo and REST APIs
On this page:
- Overview
- Potential use cases for Denodo APIs
- Default RESTful web service
- Create an API with Denodo
- Consume Denodo APIs
- Learn more
Overview
You can use Denodo to create simple APIs based off nearly any data source. Instead of architecting an application around a difficult data source, you can build a Denodo API to suit an application. See below for potential use cases and details about creating an API with Denodo.
Potential use cases for Denodo APIs
Denodo APIs can be useful if:
- An app needs a simpler RESTful interface to data, instead of a JDBC or ODBC connection.
- An app needs to combine data from multiple sources.
- An app needs data from sources that are difficult to access or parse, such as cloud sources (for example, AWS or Azure), cubes, Hadoop, LDAP, SFTP, Excel files, flat files, or other APIs.
- Existing application APIs do not meet application specifications because of inflexible output format, inability to accept filters or criteria, missing data, or data format issues.
Following are suggested use cases for an API with Denodo:
- Use an API to circumvent native APIs, so data are provided with the proper filter and in the required format.
- Use an API to expose tables as a RESTful API, cutting down on the overhead and complexity of direct database calls while providing a filter and output that meet specifications.
- Use an API to seamlessly union or join an Excel file on NPM or GitHub with relational databases.
- Use an API to query the ADS through LDAP, and return the members of a group or an individual's groups.
- Use an API as a proxy for SFTP transactions.
Default RESTful web service
All Denodo views are automatically and securely exposed through a default API. Before creating a new RESTful web service, access the default Denodo web service to check whether it is adequate.
Create an API with Denodo
To create a REST web service:
- In the elements tree, right-click the view you want to publish; then, select :
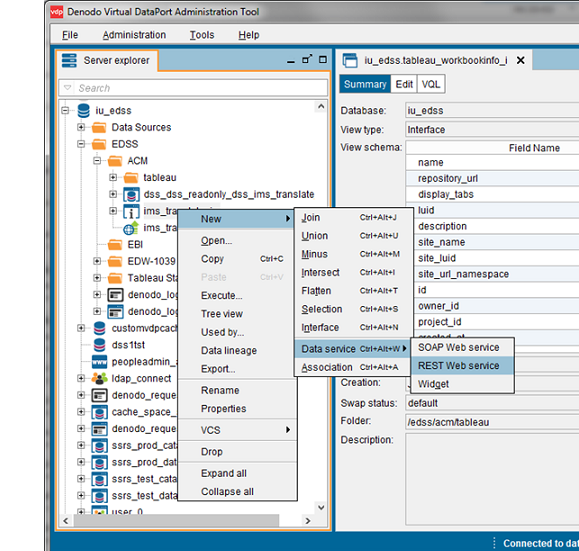
- The "Create REST Web service" dialog box will open, and you'll see the following tabs:
- : Lists the view published by the web service. This tab will be automatically populated with the attributes of the view you selected to create your REST web service.
- : Manages the configuration of the REST web service. On this tab, from the "Authentication:" drop-down menu, select , and leave the default configurations for all other fields:
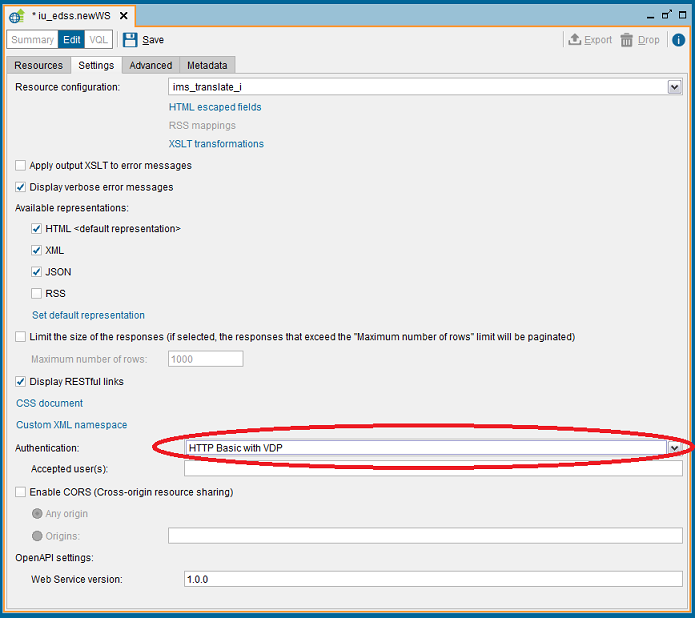
- : Manages the parameters of the connection between the web service and the Virtual DataPort Server. Accept the default settings on this tab.
- : Accept the default settings on this tab.
- Select :

- The new web service will not be available until it has been deployed. To deploy it, right-click the name of the web service in the navigation pane on the left, and select :
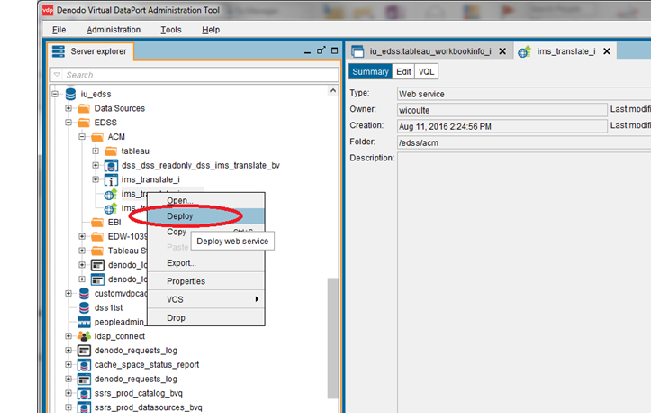
- After you've successfully deployed the service, at the top of the page, open the menu, and then select :
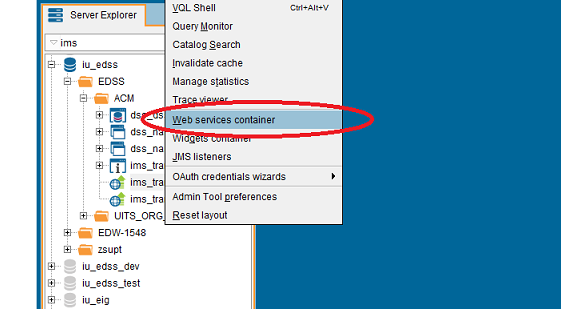
- In the "Web Services Container Status" window, locate the name of your web service, and select the associated link in the "Context Path" column:
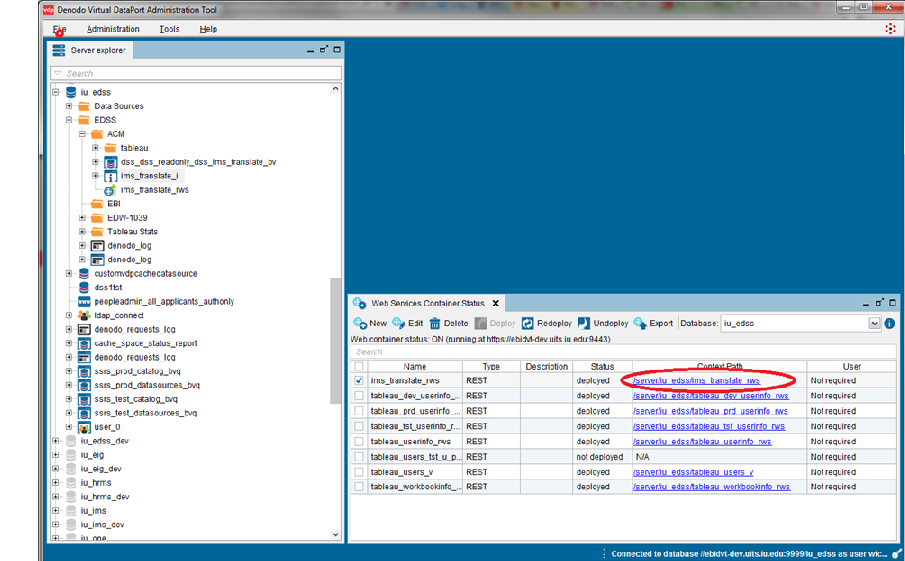
- Your browser will open a broken link. To see the data for your web service, edit the link by removing the string
:9443, so your URL resembles this:https://ebidvt-dev.uits.iu.edu/server/iu_edss/ims_translate_rws/ - If HTML is the default format for your service, you'll see a page like the below.
If prompted, log in with your IU username and passphrase.
To display the data, select the link under "View name":

Consume Denodo APIs
When you're presenting data in HTML format, Denodo will paginate the output. Formats other than HTML will not be paginated.
To set the format of the data to XML, append the string $format=XML to the URL:
https://ebidvt-dev.uits.iu.edu/server/iu_edss/ims_translate_rws/views/ims_translate_i?$format=XMLLearn more
To learn more about using Denodo APIs, see:
- How to create REST Web Services using Virtual DataPort, a video from the Denodo Community
- Virtual DataPort Administration Guide, particularly Publishing REST Web Services, from the Denodo Community
Related documents
This is document amto in the Knowledge Base.
Last modified on 2024-07-26 09:24:13.