ARCHIVED: Republishing Adobe Presenter files to the Canvas SCORM tool
At Indiana University, the Adobe Connect web collaboration and conferencing system became read-only on September 1, 2017. During the read-only phase, you can access and download previously created recordings and content, but cannot conduct live meetings or create new recordings. If you used Adobe Connect at IU, you should take steps to preserve any archived recordings you want to keep by December 28, 2017, after which the system will be fully decommissioned. For more, see ARCHIVED: About the Adobe Connect retirement.
On this page:
- Installing Adobe Presenter 10
- Exporting your Adobe Presenter recordings
- Uploading your Adobe Presenter files as a SCORM package in Canvas
Installing Adobe Presenter 10
If you haven't already done so, download Adobe Presenter 10 from IUware and install it. Make sure you uninstall any previous versions first. Be sure to back up your files.
Exporting your Adobe Presenter recordings
Downloading your Presenter recordings from Connect
To download Adobe Presenter recordings from Adobe Connect:
- Navigate to https://connect.iu.edu/ and log in with your IU credentials.
- From the top menu bar, choose .
- Select the Presenter recording you want to download, and then, from the "Content Information" menu bar at the top of the page, select .
- You'll see several options for files to download. The
.zipfile under the "Source Files" heading contains the audio files for each slide. The.pptxfile under the "Source Files" heading is your original PowerPoint file. Click to download each source file. - Unzip the
.zipfile, and add the.pptxfile to the folder with the unzipped files.Note:If your presentation is saved in
.pptformat, use PowerPoint to convert it to.pptxformat:- Double-click the file to open it in PowerPoint.
- From the menu, select , and then select the folder where your unzipped audio files are saved.
- Next to "Save as type", make sure is selected.
- Click .
Publishing your recordings to your computer
After you've downloaded your Presenter recordings from Adobe Connect, to publish those recordings to your computer:
- Double-click the
.pptxfile you want to publish to open it in PowerPoint. - In PowerPoint, click the tab.
- At the top left of your screen, click .
- In the "Edit Audio" window, click to confirm that your audio is working. If you are prompted to locate your audio file, navigate to the folder where you saved the unzipped audio files, and then select the
Media.ppcxfile. - If the audio is connected and working, you can publish the presentation:
- In the tab, click in the "Quiz" section.
- Click the tab.
- Check .
- Under the "Learning Management System (LMS)" section, select .
- Click .
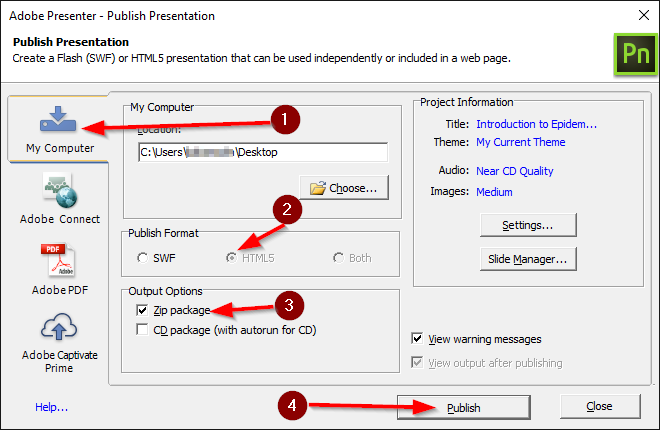
- In the Presentation section, select .
- On the left, make sure the tab is selected, and that "Publish Format" is set to .
Note:
- If you do not see this option, you may be using an earlier version of Adobe Presenter; make sure you have Adobe Presenter 10 (available from IUware) installed.
- If this option is visible but grayed out, your PowerPoint presentation may be saved
.pptformat (instead of.pptx); for help saving your file in.pptx, see the note above.
- Under "Output Options", select .
Click .
A zipped folder will be published to your computer. Unless you changed the location, the file will be published in
c:\Users\username\Documents\My Adobe Presentations\presentation_name.

Uploading your Adobe Presenter files as a SCORM package in Canvas
To upload your Adobe Presenter Files to Canvas, log into Canvas and navigate to the course where you would like to upload the Adobe Presenter recording. Then complete the following steps:
- If you haven't done so, enable the SCORM tool in the left navigation of your course:
- Click .
- Choose the tab.
- Locate the SCORM tool toward the bottom of the list of disabled tools.
- To the right of the SCORM tool, click the gear icon, and then click .
- At the bottom of the screen, click .
- On the left side of the course navigation, click .
- In the top right corner, choose .
- Navigate to the zip folder created in the publishing step above. Unless you changed the location, the file will be published in
c:\Users\username\Documents\My Adobe Presentations\presentation_name. - Click .
- After the file has uploaded, in the "Choose Upload Type" drop-down list, choose .
- Click .
- In the left navigation, click . Click the new assignment.
- Click .
- In the first text box, rename the assignment as desired.
- In the "Display Grade as" drop-down, select if you do not wish for the assignment to appear in the Grades tool.
- Click .
Adobe Presenter is unable to publish this presentation. Please check that you have enough disk space and you have appropriate permissions for the destination folder.
This is document aoeh in the Knowledge Base.
Last modified on 2018-01-18 17:40:47.