Add student feedback to a Student Engagement Roster (SER) for faculty
On this page:
- Add feedback to an individual student
- Add feedback to multiple students
- Submit Progress Report feedback
- Import grades from Canvas
- Create preset values
- Simultaneous entries
- Follow up on recommended student actions
Add feedback to an individual student
-
Select within a student's row.

The "Single Student Feedback" dialog box displays.
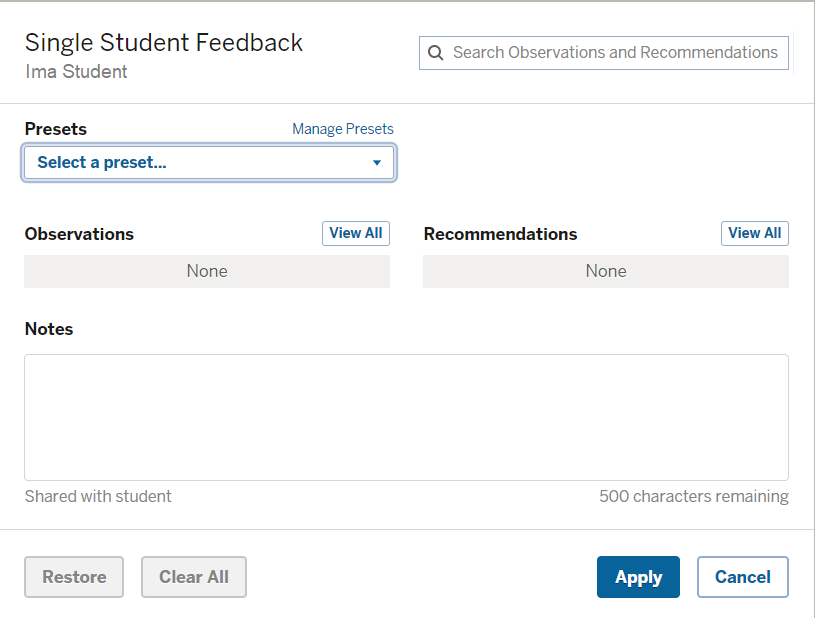
To add feedback, use one of the following methods:
- Quick search method: If you already know the value, type a few of the characters in the search field and select from the matching results.
- Presets: SER lets instructors group frequently used feedback values and/or notes into a single convenient preset value that can be selected from this drop-down.
- Menu option method: This method displays a menu of all values for either observations or recommendations.
-
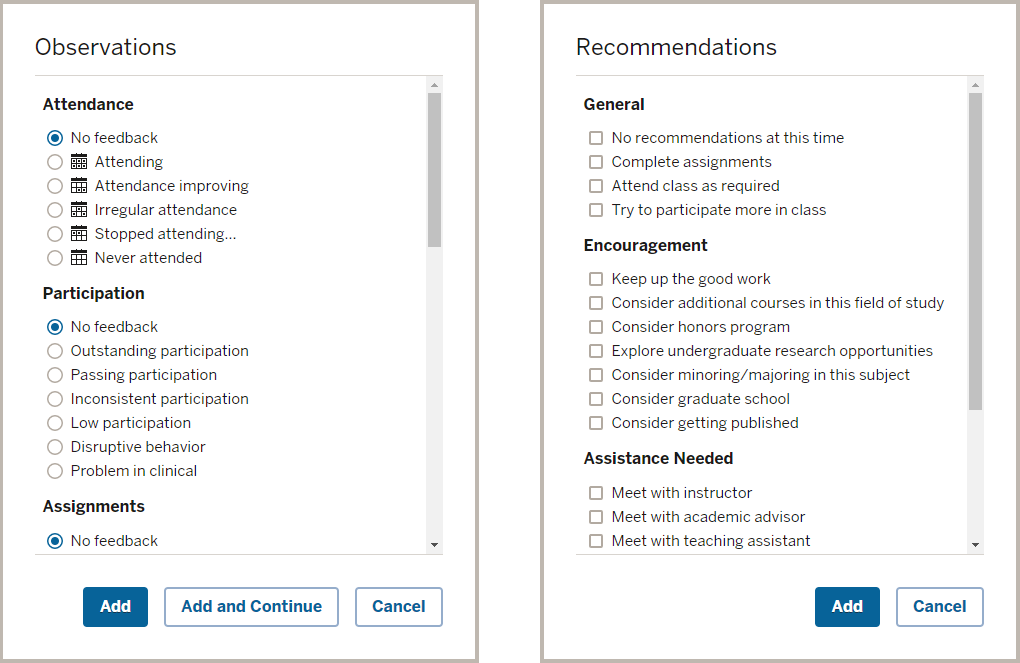
To display a list of all values for either observations or recommendations, select the corresponding button.
The associated menu displays:
-
Select the desired values.
Notes:For a list of the standard SER observations and recommendations, see Types of Engagement Feedback. Some SER observations and recommendations values are campus specific. For example, the Bloomington Observation values include a category for Early Evaluation Grading with letter grade options meant for use in this report. -
Do one of the following:
- Select .
- If you are in the "Observations" value menu, select to add the selected observation feedback and automatically navigate to the "Recommendations" list.
The "Notes" free-form text field allows you to share additional detail about the feedback with the student. In addition to these comments being viewable to the student, adding a URL or an email address in the text field will provide the student a selectable link in their SER page.
- When the values have been selected and/or a note has been entered, select . This adds the feedback as an unsubmitted (pending) change and returns you to the SER class roster.
-
Continue to add additional entries to other students as necessary.
If you applied a change to a student's feedback before submitting and wish to instead revert back to the last submitted feedback, select , and then in the "Enter Feedback" dialog box.
- Verify all changes prior to submitting.
- When you are ready to submit, in the toolbar, select (with the number of pending changes indicated).
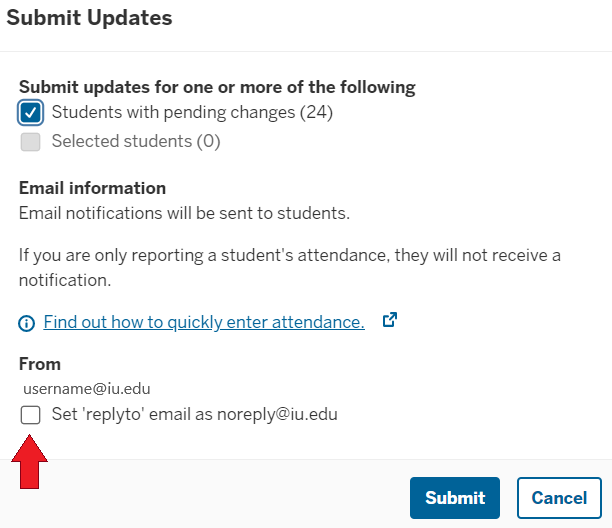
The "Submit Updates" pop-up displays.
-
Select the appropriate submit option:
- Students with pending changes: Submits feedback for only those students
- Selected students: Applies only to students selected (checkmarked) in the SER class roster and:
- Submits pending changes made for the selected student(s)
- Carries over existing Observations/Recommendations/Notes for selected students with no updates
- Adds the "No Feedback" value to selected students that have not had SER data entered yet
- By default, an email message is sent from your university email address to the student(s) indicating that feedback has been added to their class SER as soon as you select . This message directs students to review your feedback by accessing SER via One.IU or by following the link in Canvas. You can set the "Reply To" email to be
noreply@iu.eduinstead of your personal email address. If you strictly maintain that students should not email your IU account and have directed them to communicate through Canvas Inbox, for example, then you should consider checking this setting. -
Select .
The submitted values and note are now officially recorded in SER. The checkmark in the student's row confirms the submission.
An email message is sent from your university email address to the student(s) indicating that feedback has been added to their class SER and to review the feedback by accessing SER via One.IU or by following the link in Canvas.
Note:If the only value you are reporting is that the student is "Attending", they will not receive a message.
Add feedback to multiple students
SER allows you to quickly apply the same observations and/or recommendations to multiple students:
- Select one or more students in the SER class roster via Select in Bulk or the checkbox next to each student's name or by using the Canvas filtering options (see Create a filtered list of students). If you use the Canvas filtering, be sure to select students once the list is returned by using the correct checkbox option (box at top to select all or boxes for individual students).
-
In the SER toolbar, select , and then select .
- The "Multiple Student Feedback" dialog box will identify the students for whom this feedback is intended. Enter observations, recommendations and notes as you would for a single student (see above).
-
The corresponding list of values displays in the pane. Select a category and select the appropriate value.
If you decide to undo a selection before selecting , select to the right of the selection to remove it.
Important:When adding additional comments, avoid personalizing feedback; use "you" and "your" instead of the student's name when directing feedback in a comment (for example, "You have done well on your exams," or "I encourage you to participate more during class"). -
Select .
- The rows of the selected students display yellow-orange dots to indicate the pending, unsubmitted changes.
- The "History" area for each of the selected students also displays the pending change.
- The button indicates the number of students with pending changes.
Note:Bloomington faculty entering Early Evaluation grades can use the Import feature to import grades from the Canvas Gradebook for some or all of their students. Based on Bloomington faculty policy, students who must have Early Evaluation grades submitted will be identified through the Progress Reports feature. For more about the SER Import feature, see the Import grades from Canvas section below.
- Verify all changes prior to submitting.
- When you are ready to submit, in the toolbar, select (with the number of pending changes indicated).
- Select the appropriate submit option.
Select .
The submitted values and note are now officially recorded in SER. The checkmark in each row of the selected students confirms the submission.
Note:If the only value you are reporting is that the student is "Attending", they will not receive a message.
Submit Progress Report feedback
Campus offices can collect "progress reports" based on SIS student group populations (for example, 21st Century Scholars, athletes in general, athletes in a specific sport, etc.) with the SER Progress Report feature. Progress report feedback uses existing SER functionality for feedback values that instructors can provide.
When a progress report is active for any student group, a banner will display to instructors across the university. The banner displays to all instructors because students may be taking classes at multiple campuses. A different banner message will display for an instructor who has no students requesting feedback. You can see students for whom progress reports have been requested and submit feedback for them either through the banner message or by filtering students in a specific class. The link at the top of every page will take you to the same page as the banner message link.
Access students through the banner message
- At the bottom of the banner message, select :

A page will load listing all classes with students for whom progress reports are required.
- Select the class for which you would like to submit feedback. You will see a list of students in that class pre-filtered by progress reports.
- Select the students for whom you would like to submit feedback, and enter the necessary information. For details, see Add feedback to multiple students. Then, select .
- Once you are ready to submit all feedback, in the upper right, select . A "Submit Updates" pop-up will appear. Select the appropriate submit option, and then select .
Filter students in a class
- From your roster list, select the class for which you would like to submit feedback. A page will load with a list of students in the class.
- At the top of the page, select . In the "Filter" pop-up, if the class includes students who require progress report feedback, you will see a "Student Progress Reports" section. If no students require progress report feedback, this section will state that you don't have any progress reports to complete.
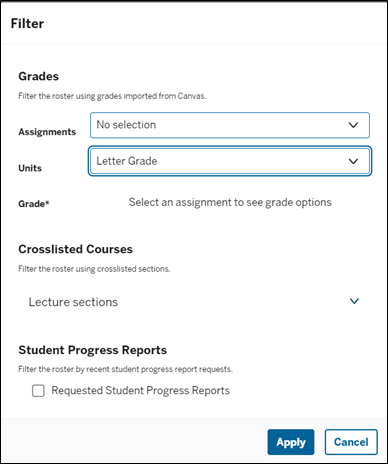
- Check , and select .
Note:You can use the filter in conjunction with other filter options available for grades imported from Canvas.
- Select the students for whom you would like to submit feedback, and enter the necessary information. For details, see Add feedback to multiple students. Then, select .
Import grades from Canvas
You can use the SER Import feature to import total grades from the Canvas Gradebook into the SER for some or all enrolled students. Once you have imported grades, you can adjust the imported values, if needed, and apply the grades to the class roster as pending feedback. You can then add any additional SER feedback or comments and submit.
- Before you can import grades into the SER, the Canvas Gradebook for your class must include at least one graded assignment that is visible to students, and the total value for the course must be in the form of a letter grade.
- Importing grades will overwrite pre-existing pending feedback in the SER. UITS recommends submitting any pending feedback before you import grades. (Students with pending feedback will have a yellow dot at the right end of their row on the class roster.)
Import grades
- All students: To import grades for all students in your roster:
- In the SER toolbar, select :

- In the "Import data" pop-up that appears, select to begin importing.
- In the SER toolbar, select :
- Some students: To import grades for only some of your students, you'll first need to create a filtered list of students.
To create a filtered list of students:
- From the SER toolbar, click .
- Filter by Canvas assignment, grade unit type, and numeric grade range or letter grade (required).
Once the filtered student list is to your satisfaction, select , and then, in the pop-up that appears, confirm your selection.
Review and resolve imported data
Once the page refreshes and grades are importing, a table will display with all enrolled students (sorted by last name), their imported Canvas grades, and the converted grades for SER.
Imported grades are the current total grades for each student. For all campuses except Bloomington, as well as IUOCC courses, the converted grades map to "Current Grade" SER feedback values. For Bloomington courses, imported grades map to "Early evaluation" SER feedback values.
You can change any student's converted grade before applying by selecting a different value from the drop-down menu under "Converted grade".
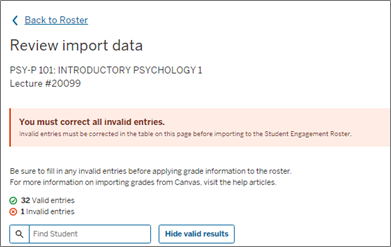
If there is no grade in the Canvas Gradebook for a student, or if a Canvas grade does not match a valid grade value in SER, you will see a warning message near the top of the "Review import data" screen, as well as the number of students with valid imported entries (following the green checkmark), and with invalid entries (red "X"):
If no valid grade was found for a student, the student's imported grade value will read "No Grade". To resolve, select a value from the drop-down under "Converted grade":
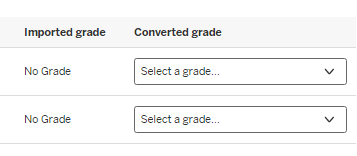
Possible values for both "Current Grade" and "Early Evaluation" are: A+, A, A-, B+, B, B-, C+, C, C-, D+, D, D-, F, I, and S.
- To show only invalid entries you need to resolve, select . The table will auto-refresh as you resolve each student, meaning you can keep your cursor in the same spot and the list will shift up after you select each grade. Once all grades are valid, select to see the full table of students again.
- If you need to return to the main roster page, in the upper left, select . However, this will cancel any import that you haven't yet applied.
Apply reviewed grades to the roster
Once you have validated all grades, scroll to the bottom of the list and select . In the confirmation dialog that appears, if you need to make more corrections, select . Otherwise, select to proceed. This will apply the import Canvas grades as pending feedback on your roster.
Once the imported grades have been applied, you will see a success message with a link to return to your main roster:

The newly imported grades will appear as pending feedback in the roster, indicated by yellow dots on the right side of each student's row. The button will also appear darker, and include the number of students who have pending feedback to submit.
Add additional feedback and submit
UITS suggests adding feedback for students in addition to their grades. One option is to submit the Current Grades (or Early Evaluations for Bloomington) so students can see these values as part of their classroom engagement feedback, and then provide additional SER feedback. You can also provide individual feedback for students, and then submit both grades and feedback at once.
Especially for classes with large enrollments, after applying imported grades, remember that you must wait for auto-save to complete before you can submit pending feedback. While auto-save is running, under the button you will see a "Saving…" message:
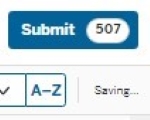
Once you see a "Last Saved: [day and time]" timestamp in place of this message, auto-save has completed and you can submit or provide additional feedback.
To submit, select and verify which students' feedback you want to submit. Then, in the confirmation pop-up that appears, select again.
Create preset values
You can group a combination of feedback values and/or notes that you use frequently into one convenient preset value. When selected, the preset automatically selects that combination of feedback.
To create a preset:
- From either the "Single Student Feedback" or "Multiple Student Feedback" dialog box, select .
- From the "Manage Presets" dialog box, select .
- Enter the name of the preset.
- Select the feedback values to group together.
- Enter any additional feedback comments to include with the preset in the "Notes" section.
- Select .
- Confirm the changes in the next pop-up by selecting .
The preset is now available as an option under the "Presets" drop-down, allowing you to quickly apply this combination of feedback to the student(s).
Once a preset is created, the manage "Presets" dialog box also provides the ability to edit, rename, or delete a preset value.
Simultaneous entries
In the event there are simultaneous updates to the same class, SER uses the first-come, first-served rule, capturing the earliest change. This occurs either when multiple instructors are updating or when a single instructor attempts to update while SER is still in the process of saving their prior change. The following message displays in these situations, indicating changes were not captured and prompting you to reload the page to see the most recent changes:
Could not update the roster due to more recent changes done by you. Reload the page to continue editing. Close any other instances of the roster which may be open to prevent further conflicts.
Follow up on recommended student actions
Instructors are encouraged to maintain their class rosters throughout the semester.
If you submit the "Consult with instructor" recommendation for a student, the tab will display in the header. This tab lets you indicate that you have met with the student, closing the loop on this action recommendation.
To indicate in SER you have met with the student:
- In the header, select .
- In the student's row, check , and then select .
A verification pop-up displays with a reminder that after this update, you should remove this action recommendation if you no longer want the student(s) to see it.
- In the pop-up, select .
The loop for this action recommendation is closed, which is now noted in the student's "Details" section. Note that if you choose to leave the recommendation in place for the student, even after submitting the action to close the loop, the student will continue to display in the tab until the recommendation is removed.
- Select to return to the roster page.
This is document aryv in the Knowledge Base.
Last modified on 2024-06-12 13:35:19.