ARCHIVED: In Oncourse, how do I export the contents of my Email Archive?
To preserve messages and attachments stored in the Oncourse Email Archive tool for after Oncourse is retired, you can download a copy of all Email Archive content, as described below.
On this page:
- Downloading and extracting the ZIP file
- Browsing and reading messages
- Searching for messages and attachments
Downloading and extracting the ZIP file
If you plan to export and maintain local offline copies of any student information (including but not limited to names, University ID numbers, or grades), you are responsible for taking adequate security measures to handle and safeguard such data, as it remains sensitive university data.
For more, see Protecting Data & Privacy.
For more on handling sensitive data, see:
To download and extract a ZIP file of your Email Archive:
- Log into Oncourse and navigate to the site with the Email Archive you wish to save.
- From the menubar, select .
- Click the button. The following message will display:
Success: Your export request has been received and will run in the background. You will receive an email notification when the file is available to download.
- Check your email for a message with the subject "Email Archive export complete...". It can take up to 15 minutes for this message to arrive, depending on the amount of content in the Email Archive.
- Click the link in the message to download the ZIP file containing all messages and attachments in the Email Archive. If you are not already logged into Oncourse, you may be prompted to do so.
- Once the download is complete, locate the file and unzip it:
- In Windows, right-click the file and, from the context menu, select .
- In OS X, double-click the file.
The resulting folder will contain an index file named index.html and a folder named messages containing separate folders for each message.
Browsing and reading messages
To begin browsing your downloaded copy of the Email Archive, open the file named index.html in your browser. This page contains links to every message, much like the Email Archive tool in Oncourse. Messages are listed in reverse chronological order, with the most recent message on top. A paper clip icon next to the subject indicates that the message has one or more attachments.
To view a message, click its subject. Attachment links appear at the bottom of the message, just as in Oncourse. Click the attachment links to open them. To return to the index, click at the top of the message.
Searching for messages and attachments
To search the index file for messages by title or author, use your browser's search feature. For searching the full text of all messages or to search for attachments by filename or type, use the search function in your operating system. Basic searching instructions for Windows and OS X are provided below.
Windows 8 and 7
- In the File Explorer or Windows Explorer, open the folder containing the
index.htmlfile. - In the search box to the right of the address bar, type your search expression. Results will begin to appear in the Explorer window.
- To search full text and all file attributes (name, type, author, etc.), type your search expression and press
Enter. - To search for a file with a specific name or extension, in the search box, type
name:, followed by all or part of the filename (e.g.,name:minutes). - To search for a specific file type, type
type:followed by the file extension or descriptive name for the type (e.g.,type:docx,type:word,type:pdf,type:adobe,type:pptx,type:powerpoint, etc.) - To search on additional file properties in Windows 8, use the drop-down menus in the Search ribbon. Or, for both Windows 8 and 7, consult the Microsoft Advanced Query Syntax reference.
- To search full text and all file attributes (name, type, author, etc.), type your search expression and press
OS X
- In the Finder, open the folder containing the
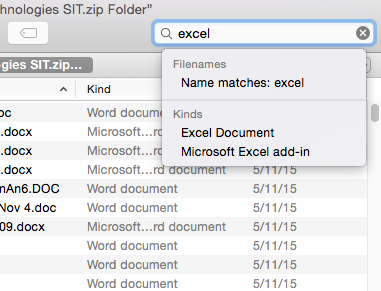
index.htmlfile. - In the search box at the upper right, type your search expression. Results will begin to appear in the Finder window.
- To search full text and all file attributes (name, type, author, etc.), press
Return. - To search for a file with a name containing your search expression, from the pull-down menu below the search box, under "Filenames", select .

- To search for a specific file type (using search expressions like
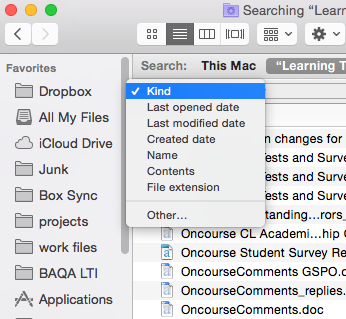
doc,docx,excel,xls,xlsx, etc.), select the desired type from the "Kinds" section of the pull-down menu. - To search on additional file properties, click the sign beneath the search box, and select the properties you wish to search on.


- To search full text and all file attributes (name, type, author, etc.), press
This is document bfmv in the Knowledge Base.
Last modified on 2018-01-18 17:10:46.