Kiosk management for front desk staff
On this page:
- Overview
- Open a kiosk
- View queues
- Unclaim a check-in as an administrator
- Manage queues
- Close the kiosk
Overview
Kiosk is a check-in system that lets you track and manage students in a variety of settings. You can use two different kiosk types for check-in: Office Kiosk or Activity Kiosk. Two elements of this tool influence what the student sees when checking in/out and how staff manage events or appointments: queues and services.
- Queues are the groups a student is virtually placed into when they check in or sign in.
- Services are optional items that students without an appointment or students attending an event can choose from during the check-in process to provide supplemental information to managers and administrators.
The following information is intended for receptionists and front-desk staff who either start and/or close the kiosk each day or are available to assist students with check-in.
Those managing an active kiosk session from the Kiosk Admin Dashboard can:
- View check-ins, manually check in a student or guest, and remove check-ins.
- View all claimed and unclaimed students and/or guests for the current kiosk session.
- Turn drop-in and guest queues off and on.
- Access several kiosk shut-down options to meet different check-in scenarios and office needs.
- Manage the advising services currently available for selection during the check-in process.
Open a kiosk
To start a kiosk, you'll generate a code on your computer, and then enter it on the actual Kiosk device.
-
Go to Kiosk Admin Dashboard.
- The dashboard displays, listing the queues associated with your authorization in Kiosk.
- Locate the kiosk instance to open, and click .
- The "Kiosk Start Code" dialog box displays the generated open code. Copy this code.
- Move to the actual device students will use to check in, and go to Kiosk Startup (does not require authentication).
- Enter the start code and click .
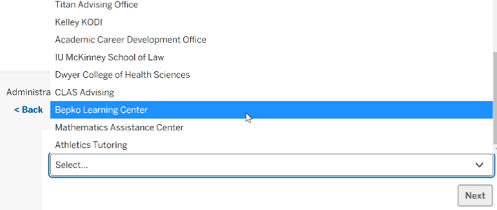
- When the "Administrator" page appears, select to open the kiosk from the drop-down menu. Click .

The Kiosk application is now open and ready for student and guest check-ins.
For Office Kiosk, the three standard queues are Appointment, Drop-in, and Guest.
For Activity Kiosk, from the drop-down menu, select the queue that you created for your event or activity. If there is only one queue, the drop-down menu will already display it, and the kiosk is ready for student check-in.
Once the kiosk is open, you can select any services for drop-in students and guests to choose from during check-in; refer to the Service Selection section below.
View queues
From the Kiosk Admin dashboard's card, click .
The "View Queues" page will display, with access to the Drop-ins and Guest check-in queues.
Check in students or guests
Kiosk administrators can manually check in students and guests:
- From the Kiosk Admin dashboard's , click . Click . The "Check in student" dialog box displays.
- If checking in a student: Enter the student's IU username, choose either a drop-in or scheduled appointment check-in type, and add a reason for the appointment (optional).
- If checking in a guest: Select the guest checkbox, enter the guest's information, select an advisor to see (optional), and add a reason for the appointment (optional).
- Click .
The student or guest is now checked in.
Remove/cancel check-ins
For drop-ins:
- Select individual students from the list and click .
- Select a removal option:
- Mark as absent and remove: Use this option when a student has left before being seen.
- Mark as not seen and remove: Use this option for any students who were not able to be seen before the drop-in session ended.
- Click , and the student or guest will be removed from the queue.
For appointment check-ins:
- Select individual students from the list and click .
- Confirm when asked if you are sure you want to cancel the check-in.
To return to the Admin dashboard, click the arrow to the left of the kiosk name.
Unclaim a check-in as an administrator
As a Kiosk administrator, to unclaim drop-ins and guests on behalf of an advisor, from the Kiosk Administrative Dashboard's "View Queues" table, locate the row of the student or guest, and click .

The drop-in student or guest will be removed from the advisor's queue and returned to an unclaimed check-in status. This allows another advisor to claim the drop in.
Manage queues
Within Kiosk, drop-in and/or guest queues are turned on by default. If your advising office needs to turn off a queue, you can do so without shutting down the kiosk itself. You can also manage services for students and guests.
Turn queues off and on
- To turn a queue off, in the "Active Kiosk" card, click .
- Click .
- From the displayed pop-up, select one or both queues to turn off, and then click .
- After the confirmation displays, click .
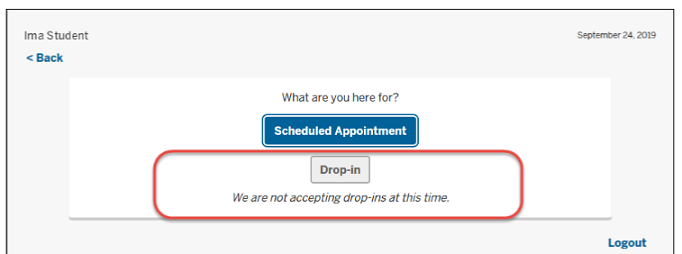
- When the drop-in queue is turned off, a message displays on the check-in page.

- When the guest queue is turned off, the option to check in as a guest is removed from the check-in page.
- When the drop-in queue is turned off, a message displays on the check-in page.
To turn on a queue, follow the same steps, deselecting the queue you wish to turn back on.
Service selection
Services are optional items that drop-in students and guests can choose from during the check-in process. Services provide supplemental information about the appointment, provide offices the flexibility in noting specific advising services available for that day, and can aid in reporting. They appear only if you have turned them on.
Services are removed from the check-in process when the kiosk is shut down; this ensures that services available on certain days are only displayed on the day they are selected.
If a service does not exist, you can add the service. Added services are available for selection to all Kiosk administrators on the same campus. (For example, Kokomo Kiosk users will not see Bloomington services, but can create their own.)
- From the "Manage Queues" pop-up, under "Service Selection", type a few characters of the service and select an option from the results. If there is no match from the results, type a keyword or short phrase for the service and press .
- When you've selected all services for this kiosk session, click . From the confirmation pop-up, click .
The service will be available in the drop-in/guest check-in process.
Services selected by the drop-in student or guest display in their card in your "Appointments" page.
Close the Kiosk
The kiosk shutdown process provides options on how to handle drop-in or guest check-ins remaining in the queue.
-
Go to Kiosk Admin Dashboard.
- From the displayed dashboard, click , and then .
- In the "Manage Kiosk" pop-up, the tab displays the number of students remaining in the drop-in and guest queues.
- If students or guests are in either queue, you'll see these options:
- Keep current check-ins in queue: Prevents the kiosk from accepting new check-ins, but keep unclaimed students and/or guests in the queue to be claimed.
- Mark all as absent and remove: Prevents the kiosk from accepting new check-ins and removes all unclaimed students and/or guests from the queue (marked as absent for reporting purposes).
- Mark all as not seen and remove: Prevents the kiosk from accepting new check-ins and removes all unclaimed students and/or guests from the queue (marked as not seen for reporting purposes).
- If there is no one in either queue, you'll see these options:
- Disallow new check-ins: Prevents the kiosk from accepting new check-ins, but keeps open your AdRx Appointments page queues; already claimed students and guests still display kiosk check-in information in the Appointments queue.
- Shut down check-in kiosk and active drop-in/guest queues: Prevents the kiosk from accepting new check-ins and closes the AdRx Appointments page queues; the Appointments queue will still display SAS appointment information but will no longer display kiosk check in information, and the Drop-ins and Guest queues will indicate the queue has not been started.
- If students or guests are in either queue, you'll see these options:
- Click , and the Kiosk Admin Dashboard will confirm the Kiosk as inactive.
Related documents
This is document bgjo in the Knowledge Base.
Last modified on 2023-07-31 12:36:35.