Create and manage AdRx custom alerts for advisors
On this page:
Overview
Alerts Management is a tool in Advising Records (AdRx) that allows authorized users to create custom alerts for students from a unique data source. Authorized users can define the details of an alert (for example, name, description, and the dates the alert is active), then apply it to students. Once created, alerts appear in AdRx; staff can then follow up, create contact notes, or create campaigns.
Authorized users are defined by their campus, but are usually the campus advising director, some or all of the unit directors, or staff that provide operational support for advising. If you are designated by your campus as a custom alert manager, you will see "Alerts Management" when you select the user menu in AdRx. To open the user menu, select your initials in the upper right.
When authorized users create alerts, all AdRx users might see those alerts for students in their caseload, or for students they look up. For that reason, authorized users should coordinate efforts where alerts may overlap and apply to the same populations (for example, separate alerts from advising, 21st Century Scholars, and honors for the same first-year seminar requirement).
To open the Alerts Management Dashboard, select , and the dashboard will open in a new tab. To see alerts you have created, go to the "My Alerts" section; to see alerts created by others, go to the "Alerts Created by Others" section.
Create a custom alert
To create a custom alert, you must add it to an existing alert template. Templates contain information that is shared between alerts. When you add an alert to a template, the information in the template is pulled into the alert, where you can edit it and make additions (for example, students, data source info, and alert dates). If there is not an existing template that works for your custom alert, you may need to create a template; see below.
Create a template
- Open the Alerts Management Dashboard.
- Select .
- Fill out each field (all fields are required), and then select . The newly created template will display on the Alerts Management Dashboard.
Create an alert from a template
- Open the Alerts Management Dashboard.
- Next to the template you wish to use, select .
- The Add Alert form will pull in the information from the template; adjust the information as needed.
- Additional alert-specific information is required at this step, including data source information, students, and the start/end dates for the alert.
- The information you enter during this step displays in AdRx.
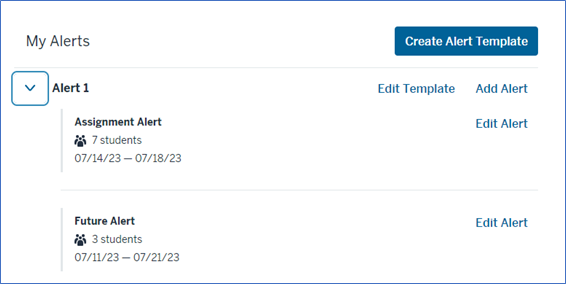
- The alert name, number of students, and start/end dates, will display on the Alerts Management Dashboard under the template.
In the example below, the alert "Creating a Template" will display in AdRx from July 11, 2023 - July 21, 2023.

An alert can also be applied to more than one group of students. In the example below, the data source for "Assignment Alert" is an IUIE report, and the data source for "Future Alert" is a separate spreadsheet.

View/edit current custom alerts
From the Alerts Management Dashboard, under the "My Alerts" section, select the expand icon next to a template to see the name, number of students, and start/end dates for any related alerts. To edit an alert, select .
If you need to edit an alert created by an authorized user, select the expand icon next to the "Alerts Created by Others" section.
Students can be added to or removed from an alert that is in progress. When students are added to an alert, it is applied to them immediately. To view it on the student's record, refresh your browser.
If you modify the template, only alerts created after the changes will be affected.
To stop an alert from displaying in AdRx, you can remove all students from the alert or delete it.
Delete an alert
- If you delete an alert, it will not impact the historical data for reporting purposes.
- An alert can only be deleted by the person who created it.
- Open the Alerts Management Dashboard.
- Select the expand icon next to the template of the alert you wish to delete.
- To the right of the alert, select .
- A form will display. At the bottom of the form, select .
- A modal will display, and require you to confirm that you want to delete the alert. Select .
- If the alert's start date has not passed, there will be an option to change the start date and the button will look different.
Delete a template
Open the Alerts Management Dashboard, then select , and then choose . If students are assigned to an alert, the button will not display.
This is document bild in the Knowledge Base.
Last modified on 2023-09-13 13:40:50.