ARCHIVED: Set up a Google at IU groupspace
On this page:
- Overview
- Access the groupspace
- Set up the Google site for your groupspace
- Set up the Google group for your groupspace
- Set up the Google calendar for your groupspace
Overview
For managing projects and other types of group activities, Google at IU groupspaces provide a collaborative workspace with access to multiple integrated Google tools, including calendar, mailing list, wiki, embedded docs, etc.
Those added to a Google group are automatically given access to the associated Google site and calendar. The groupspace site comes pre-configured with tools and features to facilitate communication and collaboration (for example, pages for announcements, online discussion, calendar, file storage and organization). This guide will help you customize your Google at IU groupspace site, group, and calendar to suit the specific needs of your group.
Always use your Google at IU account for Indiana University coursework and other university business. Personal (free) non-IU Google accounts are not approved for institutional data. When working in Google apps, you can check the upper right to see which account you're logged into.
By default, unless you sign out, Google keeps you logged in, even if you close your browser; thus you could be logged into your personal account, even if you started from google.iu.edu. Consider adding a profile picture for each of your accounts to help differentiate between them.
Access the groupspace
- You can access your site by going directly to its URL, which was included in your confirmation message.
- Alternatively, go to sites.google.com. If you're prompted to log in, enter your email address as
username@iu.edu(regardless of what you use as your primary IU email address) and click to log in via IU Login. When you're logged in, all your sites will be listed in alphabetical order. To open a site, click its title.
Every new groupspace includes these pages and features; later sections in these instructions describe how to customize pages and/or remove any you don't need:
- Home page: Provides a dashboard showing recent and upcoming activity and events. Google gadgets provide a summary of upcoming events, recent discussion posts, and recent announcements, including a gadget where you can provide a description of your group.
- Announcements: Here you can post announcements for the group, which appear in reverse chronological order. You can also use Announcements for posting meeting minutes, or any type of regular updates. Be aware that announcements posted to this page are not distributed to group members by email.
- Calendar: Use the Calendar for posting information about group meetings and events.
- Files: Provides a space for storing and organizing files and links to share with group members.
- Mailing List: As a space for group reading and/or discussion, members can post messages directly on this page or send mail to the group email address.
- Wiki: Use the wiki for creating content consisting of any combination of text, media, and Google gadgets.
- Member List: Store contact information here for your group members. You'll need to add or update manually.
- Task List: List and track the completion of tasks assigned to group members here.
- Embedded Docs: Provides an example illustrating how a Google document can be embedded within a groupspace page. You can either replace the sample document with a document for your group, or delete the page.
- Blog: Use for posting blog entries.
Set up the Google site for your groupspace
The Google site for your groupspace has a predefined set of pages, tools, and features. The site also includes instructional prompts on how to customize specific pages and features. Before you share the site with others, you can remove the prompts and customize the site for your intended purpose.
To make changes to any page(s) in your site, first enter page edit mode:
- In the navigation menu on the right, click the page you wish to edit. The page will load in the main content region of your browser.
- On the upper right above the IU banner, click the icon (looks like a pencil), and the page will display in edit mode.
Edit page titles
The title of each page appears in the site navigation as well as the top of the page when the page is loaded.
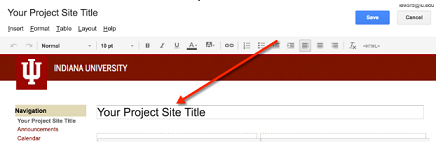
- Navigate to the page, and enter page edit mode. Select the text in the title area, and delete it.
- Enter the title text you wish to use, and click on the upper right.
Edit pages
Most pages contain instructional or informational content you enter via a rich-text editor. Some also have Google gadgets that load other Google tools or documents, or use a template with special features you can edit.
Content
- Navigate to the appropriate page and enter page edit mode.
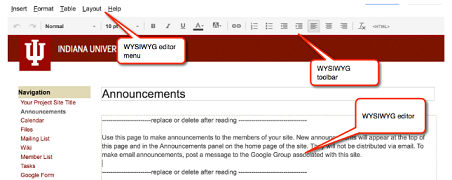
- The rich-text editor appears just below the page title, with a menu and toolbar above the IU banner.
- Select text to remove and enter your own, or leave the text area empty. Use the editor menu and toolbar to format text, control the page layout, and/or insert tables, images, or gadgets.
- When you are finished, click on the upper right.
Gadgets
The site home page and several other pages include gadgets that load other tools or documents. Google gadgets display in the rich-text editor as a gray box with a title. Text may appear above or below the gadget.
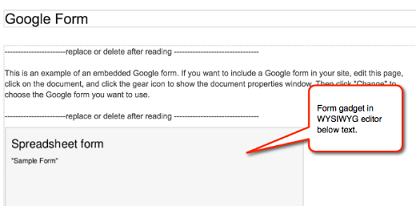
To edit any Google gadget, in page edit mode, click the gadget to select it, and a toolbar of controls will appear either above or below the gadget.

To edit a gadget's settings, click the properties (gear) icon on the far left. To delete a gadget, click the remove (X) icon.
- Text gadget on the home page: Provides information about the site for your members.
- After clicking the gadget's properties icon, a rich-text editor will appear.
- Delete the instructional text and replace it with information about the site for your members.
- Click to save your gadget changes, and then click again at the upper right.
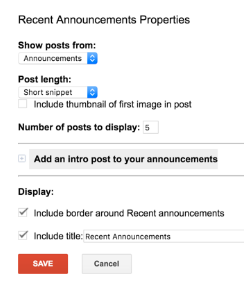
- "Recent announcements" gadget on the home page: Shows the most recent announcements from the Announcements page. To change this gadget's settings:
- After clicking the gadget's properties icon, you can use the options in the properties window to control the amount of each post displayed in the gadget, the number of posts to include, etc.
- Click to save your changes, or to exit without saving. Then click again at the upper right.
- After clicking the gadget's properties icon, you can use the options in the properties window to control the amount of each post displayed in the gadget, the number of posts to include, etc.
Add pages
- Click the icon on the upper right.
- On the "Create Page" screen, in the "Name your page:" field, enter a name for the new page.
- Select a template from the menu options:
- Web page: For text, images, inserted gadgets, etc. (for example, home page, Calendar, Wiki)
- Announcements: For creating a series of announcements or other types of posts, listed in reverse chronological order (for example, Announcements, Blog)
- File cabinet: For uploading and organizing files (for example, Files)
- List: For creating sortable lists with one or more columns (for example, Member List, Tasks)
- Start page: For creating a personalized collection of gadgets; individuals in the site can create their own collections
- Choose a location for your page. You can either place it at the same level as other pages, or create a hierarchy by placing it beneath a specific page.
- Click . Your new page will open in edit mode.
- Create the content for your new page, and when you are finished, click on the upper right.
Note:New pages are not automatically added to the site's navigation; see Editing site navigation.
Remove pages
To remove a page from the navigation without deleting the page, see Editing site navigation. To delete a page:
- From the page you wish to delete, click the icon (gear), and select .
- When prompted to confirm, click . Alternatively, click to return to the page without deleting it.
Edit the site navigation menu
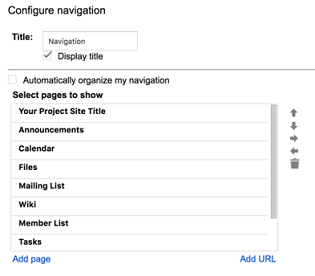
- Click the icon (gear), and select . Click anywhere within the left navigation menu to open the "Configure Navigation" screen.
- Under "Select pages to show", pages included in the navigation menu are listed in order.
- To move or delete an existing page in the navigation, select the page and use the arrow icons to move it, or the trash can icon to delete it.
- To add a page to the navigation, click . Select the desired page from the site map, and click . You'll return to the "Configure navigation" menu.
The new page will be added to the bottom of the navigation menu. To move it to a different location, use the arrow icons.
- To add a link to an external resource, click . On the resulting screen, type both the text you wish to display and the URL or email address in the appropriate fields. Click .
- When you are finished with navigation changes, click to close the screen. Click again to exit site layout.
Share and manage access
By default, members of the Google group associated with your site have read-only access to the site (which is not accessible to the public). You can change the access level for the group, as well as for individuals and/or the public.
groupspaceadmin@iu.edu. This account is added to all groupspaces to prevent them from being deleted if the original owner leaves the university. Do not change the permissions for this account, or remove it from your groupspace.
- Click on the upper right. The "Sharing and Permissions" screen will open, with you listed as owner and the group with the default "Can view" permission.
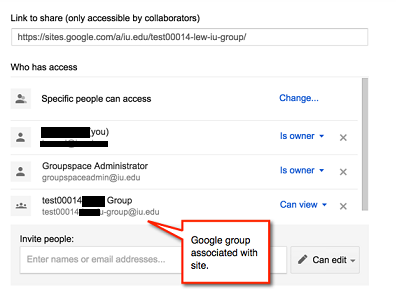
- To change the access level of any person or group listed:
- Click the permissions menu to the right of the individual/group name and choose from:
- Can view: Can read any page in the site
- Can edit: Can edit any page in the site
- Is owner: Can add/edit/delete pages and manage all site settings
- Click to complete the change, or to cancel.
- Click the permissions menu to the right of the individual/group name and choose from:
- To grant access to specific individuals or groups (for example, if certain members of your group, or an entire group, needs elevated access):
- Enter the individual's or group's Google account IDs in the "Invite people" box. For Google at IU accounts, use the person's primary IU email address (for example,
username@indiana.edu,username@iupui.edu,username@iuk.edu) orusername@iu.edu. For non-IU individuals, use their Gmail addresses. Separate the IDs with commas, or enter one per line. - Set the desired level of access in the permissions menu to the right.
To add an optional message, click .
- To save your changes and send notification to the individual(s) or group(s), click .
- Enter the individual's or group's Google account IDs in the "Invite people" box. For Google at IU accounts, use the person's primary IU email address (for example,
- To remove access for an individual or group:
- Locate the person or group under "Who has access".
- Click to the right of the permissions menu, and then click either , or to back out.
- To change the visibility/privacy of the site:
- Under "Who has access" and to the right of "specific people can access", click . A screen with options will appear:
- On: Public on the web
- On: Anyone with the link
- On: Indiana University
- On: Anyone at Indiana University with the link
- Off
Choose the option that is best suited to your purpose. If you chose an Indiana University option, you can also change the access level from to , if you wish.
- Click either , or to back out.
- Under "Who has access" and to the right of "specific people can access", click . A screen with options will appear:
- To change the access level of any person or group listed:
Set up the Google group for your groupspace
The Google group associated with your site both provides members with access to the site and calendar, and functions as a mailing list and web-based discussion forum for the group.
- Before you add people to your group, review the permissions and settings to make sure they are appropriate for your intended use.
- This section covers the basics of managing your group. For more, see Google Groups Help.
Access group management features
To access the group's management features, choose one of these options:
- Via the group URL: Refer to the email confirmation you received when you created your site, which contains the group URL.
- Enter the URL in your browser's location bar, and log into Google if needed (upper right).
- On the upper right, click .
- Via the Google Groups page:
- Go to https://groups.google.com, and log into Google if needed (upper right).
- Click , and to the right of "Switch organization view to:", click .
- Groups you're in will display. Locate the group you wish to revise, and click below its name.
The group management menu will open on the left, with current group members listed on the right.
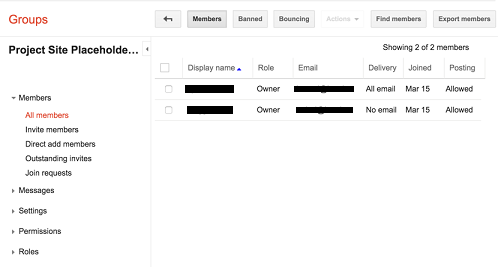
By default, your Google group is visible only to group members, and with the group's full membership visible only to owners. Before adding members, you may wish to review and customize the many available privacy and configuration options in the Settings, Permissions, Roles, and Information menus to better suit the purpose of your group. For more, see Manage Your Groups.
Add members
You can invite members to your group either by inviting them or by adding them directly. When you invite members, they receive an email invitation and must accept it before participating in the group; recipients are not members until they accept. When you add members directly, they are added to the group and receive notification.
- Add members by invitation:
- In the group management menu under "Members", click .
- In the text box under "Enter email addresses of people to invite", enter the Google account IDs of those you wish to invite. For Google at IU accounts, use the person's primary IU email address (for example,
username@indiana.edu,username@iupui.edu,username@iuk.edu) orusername@iu.edu. For non-IU individuals, use their Gmail addresses. Separate the IDs with commas, or enter one per line. - Under "Write an invitation message", enter the message you wish to send to the list of invitees. Click .
- Complete the CAPTCHA form to prove that you are a human by entering the word or phrase that is displayed, and clicking . You will receive confirmation that your request was sent.
- To return to the home page, click . If you wish to send additional invitations, click .
- Add members directly:
- In the group management menu under "Members", click .
- In the text box under "Enter email addresses to add as members", enter the Google account IDs of the people you want to invite. For Google at IU accounts, use the person's primary IU email address (for example,
username@indiana.edu,username@iupui.edu,username@iuk.edu) orusername@iu.edu. For non-IU individuals, use their Gmail addresses. Separate the IDs with commas, or enter one per line. - Under "Write a welcome message", enter the message you wish to send to the list.
- Under "Email Subscription Options", leave the default setting if these members should receive a copy of every message sent to the group, or select a different option. Click .
- Complete the CAPTCHA form to prove that you are a human by entering the word or phrase that is displayed, and clicking . You will receive confirmation that your request was sent.
- To return to the home page, click . If you wish to send additional invitations, click .
Remove members
- In the group management menu under "Members", click . A sortable list of group members will display.
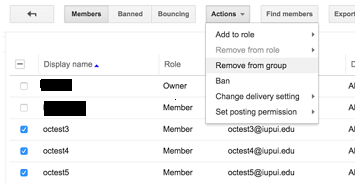
- In the column on the left, select the individuals you wish to remove. From the menu, select .
- Click to confirm, or to back out.
Set up the Google calendar for your groupspace
Before you start using the calendar for your groupspace, check the sharing settings to ensure they meet the group's needs and privacy expectations:
- Go to calendar.google.com. In the list of calendars on the left, click the down arrow to the right of the groupspace calendar name to open the context menu and display the calendar settings. Click .
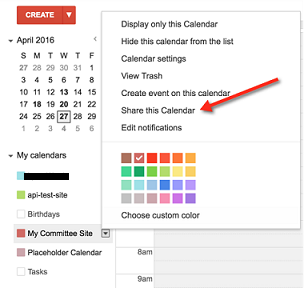
- On the "Share this Calendar" screen, if you do not want this calendar to be viewable by the public or people at IU, deselect .
- Under "Share with specific people", names are displayed of those with whom the calendar is shared. By default, it's shared with groupspace members; they have permissions to "See all event details".
- To grant access to other individuals or groups, in the "Person" column, enter the Google account ID for the person, or email address of the Google group, you wish to add. Click .
- To change the permissions for any group or individual (for example, if some need elevated access), choose the desired access level from the menu. At the top of the page, click .
Related documents
This is document agjy in the Knowledge Base.
Last modified on 2020-06-29 15:06:01.

