ARCHIVED: Use Microsoft Teams for communication, collaboration, and live meetings in your courses
On this page:
- Overview
- Access Microsoft Teams
- Work in channels
- Participate in live meetings
- Learn more and get help
Overview
Microsoft Teams at IU is a collaboration tool that gives Indiana University students, faculty, staff, and external users the ability to work together and share information in a common space. Included among its features are real-time collaboration, one-on-one chat, and file sharing.
Terms and concepts
Before you start working with Microsoft Teams, you'll need to know a few basic terms and concepts that will be used throughout this documentation.
- Team: A team is a private or public workspace with tools for asynchronous and synchronous collaboration and communication.
- Channel: A channel is a space for live and asynchronous interaction (chat) and collaboration within a team. A team can have multiple channels and typically each channel focuses on a different topic. Instructors can control general channel permissions and restrict access to specific channels.
- Meeting: A meeting is a live audio- or videoconference with screen sharing, file sharing, chat, and many other capabilities. Anyone can start a live meeting in Microsoft Teams. Instructors can set up a persistent meeting channel and room for their class.
- Apps: Apps are third-party tools and applications that are integrated with and extend the functionality of Microsoft Teams.
- @mentions: The "@mention" feature allows you to call members out or invite them to participate in a channel or thread by name. To use it, type the
@symbol followed by the person's name. Autocomplete will help you find the right person as you type. To get the attention of all members of a channel, enter@channelfollowed by your channel announcements.
Access Microsoft Teams
Access Microsoft Teams from a browser
If you have not yet downloaded the Microsoft Teams client app, you can access Microsoft Teams at IU in a web browser:
- In either of the fully supported browsers (Google Chrome or Microsoft Edge), go to Microsoft 365 at IU
.
Important:
Microsoft Edge Legacy support ended on March 9, 2021. If you still have Edge Legacy, UITS recommends installing the new Chromium-based Microsoft Edge by running Windows Update.
- You will land on your home page, which includes icons for launching various Office apps. Click to launch the Microsoft Teams app.
Access Microsoft Teams from a desktop or mobile client
To get the most out of Microsoft Teams, download and install the client app for your desktop or mobile device:
- To download the client to a desktop device, go to Download Microsoft Teams, click , and install the download package.
- To download to a mobile device, go to the Google Play Store or iOS App Store, locate the Microsoft Teams app, and install.
After launching the app, you will be prompted to sign in. Follow steps 3-5 in Access Microsoft Teams from a browser. After a successful login, the app will open, providing access to all the teams to which you belong as well as the ability to create new teams.
Access Microsoft Teams from a deep link and/or URL
In Microsoft Teams, it's possible to generate direct URLs to a specific team as well as specific resources within a team.
If you click a deep Microsoft Teams link/URL in a fully supported browser, you'll be given the options to:
- Continue in the current browser
- Continue in the appropriate client app (if installed)
- Download the client app (if not installed)
If you click a Microsoft Teams link/URL in an unsupported browser, you'll be given the options to:
- Continue in the appropriate client app (if installed)
- Download the client app (if not installed)
Join your course team
Your instructor should have posted or sent you a code that you'll use to join the team for your class. To join the team:
- Log into Microsoft Teams with a fully supported browser or the app as described in Access Microsoft Teams.
- Click the icon (to the left in desktop browsers and clients; at the bottom in mobile clients).
- Click the icon (
 ) and select .
 - Enter the team code provided by your instructor and click .
- You'll be taken directly to the team for your course.
Your course team will now be included in your list of teams when you click the icon.
Work in channels
Each team in Microsoft Teams is made up of one or more channels. A channel is a place where team members can chat, share and collaborate on content, conduct live meetings, and interact in a variety of other ways. The team for your class probably has at least two channels, one named "General", where anyone can post, and a read-only channel named something like "Live Class Meetings" containing a persistent link to your course meeting room. There may be others devoted to specific topics and/or restricted to specific class members.
Navigate channels
To see and navigate among the channels for your class using a supported browser or the Microsoft Teams desktop client:
- Log into Microsoft Teams, click the icon, and select the team for your class.
- The list of channels available to you will appear beneath the team image and title:
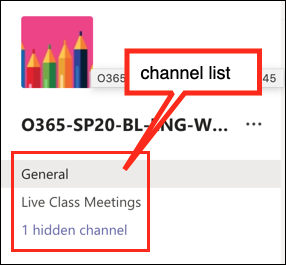
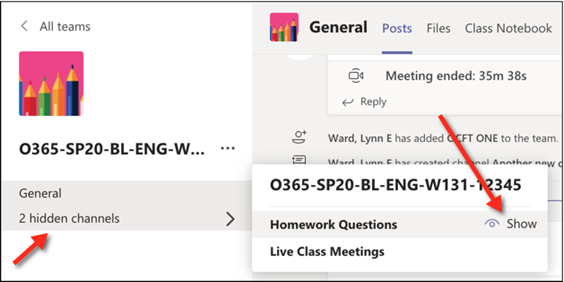
If there are hidden channels, click the link to view them. To unhide a channel, click the link and then, next to the desired channel's name, click :
- To view the activity and content in a channel, select the channel from the channel list.
Channel tabs
Each channel in Microsoft Teams has multiple tabs. Typically, three or four tabs display by default, but the team owner can create additional tabs to give class members easy access to Microsoft and third-party apps. For example, you might see tabs like the following:
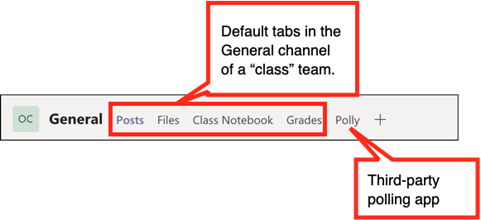
- The tab is for real-time and asynchronous chat among team members. All activity, even actions taken in other tabs, is also logged in the activity feed under .
- The tab is for creating and/or uploading files for collaboration.
- The or tab provides access to a shared MS OneNote page or notebook.
-
Important:The and tabs found in the "General" channel for class teams are not currently active at IU. Instructors and students are encouraged to use Canvas for assignments and grades.
Read or post to a channel
The chat history and channel interactions display under the tab in chronological order from oldest to newest, with the most recent activity at the bottom of the scrolling list. To catch up with what's happening, look for the "--Last Read--" divider. Everything below "--Last Read--" is either completely new or includes at least one new reply since the last time you visited the channel.
To post to a channel:
- Log into Microsoft Teams, navigate to the team for your class, and select the desired channel.
- In the editor at the bottom of the channel window, start typing your message; in the mobile app, if you don't see the editor, click . For additional formatting options, click the icon (
 ). Use the available tools to format your message. To mention specific users or channels in your message, type
 @and begin typing the user or channel name. Microsoft Teams will show you a list of matching users/channels from which to select.In some clients, these additional options may be available via the editor toolbar:
- [Format as] or
- or
- , which lets you select channels from any team to which you have access.
- When you are finished typing and formatting your message, click the icon (
 ) to post your message.
Other types of "post" interactions
You can add other types of interactions to the channel using the other icons beneath the editor box. In addition to the default options listed below, team members can select from a variety of third-party apps by clicking the symbol ().
- Attach a file: When you click the icon (
 ), you'll be given options to select the file from other teams/channels, Microsoft OneDrive at IU, or a local storage device. The file will be added to the activity feed and the tab in the channel.
 - Add an emoji: The icon (
 ) adds an emoji into your message. When inserted into a formatted message, emojis are small. When posted without additional text, they are large.
 - Add a sticker: Use the icon (
 ) to insert a fun image. Stickers on a variety of topics and themes are available.
 - Start a "Meet Now" meeting: Click the icon (
 ) to start a live meeting. This adds a button to the channel so others can join the meeting room too.
 - Insert a video from Microsoft Stream (on SharePoint): Use the icon (
 ) to insert a video from Microsoft Stream (on SharePoint), a video management system similar to Kaltura. Meetings recorded in Microsoft Teams are stored in Stream.
 - Give a badge: To praise one or more members of the team, use the icon (
 ). You'll be prompted to select the badge and the recipients.
Participate in live meetings
Live meetings in Microsoft Teams support up to 250 simultaneous participants. Course members can access Microsoft Teams via a supported browser (Google Chrome or Microsoft Edge), desktop client app (available for Windows, MacOS, and Linux), or mobile app (available for Android and iOS). Supported features may vary by client.
Links to the Microsoft Teams workspace and/or live meeting space for your course can be added to your course navigation in Canvas (or elsewhere in your course).
Any member of your course team can initiate an impromptu meeting and invite others to join. In addition, your instructor may have set up a persistent link to a live meeting room in the team for your class. If so, you may see a channel in your course team called something like "Live Class Meetings" with a link to the meeting room. Your instructor may have also posted a link to the room in your online course materials. Ask your instructor if you are uncertain about how to access the persistent meeting room for your course.
Join or start a meeting
There are several ways to join or start a meeting; the first couple of steps may vary depending on the method you use and where you start. Once you reach the "Join" screen, however, the instructions are the same regardless of how you got there.
Join from a link or URL outside of Microsoft Teams
If you are given a hyperlink or URL to join your course meeting room, to join the meeting:
- Click the meeting link or enter the meeting URL in the location field of your browser.
- You'll be taken to a page where you have the option to join on the web, download the app, or launch the app if it's already installed. For the best meeting experience, sign in and use the Microsoft Teams app.
- If you must join via a browser and you have a Microsoft Teams account, click the link at the bottom of the screen.
- If you don't have an account, enter your name to the left of the button.
- Use the video and audio toggles to enable/disable your video or audio before joining.
- Click to enter the meeting room.
Start a new "Meet Now" meeting from within Microsoft Teams
To start a new "Meet Now" meeting:
- In any channel where you have post permission, click the icon (
 ).
). - Use the video and audio toggles to enable or disable your video and audio.
- Click the button to enter the meeting room. A button will appear in the channel where you initiated the meeting.
- To invite others to the meeting, see Invite users into the meeting room.
Join an in-progress meeting from a channel
When a live meeting is in progress, a button will appear in the channel where the meeting room was created. To join the meeting:
- Click .
- Use the video and audio toggles to enable or disable your video and audio.
- Click to enter the meeting room.
Join an in-progress meeting from an invitation
If you are logged into Microsoft Teams, you may receive a pop-up or full-screen invitation to join an in-progress meeting.
- If you're using a browser or desktop app, click or to join the meeting, or click at the upper right to decline.
- If you're using the mobile app, click to join the meeting or to decline.
Join via a meeting link in a channel
Links to existing rooms can be pasted into any channel. In fact, your course team may include a channel called "Live Class Meetings" with a link to a persistent meeting room. To start or join a meeting from a link in a channel:
- Locate and click the meeting link. It will look something like this, although the link text may have been modified:

- Use the video and audio toggles to enable or disable your video and audio.
- Click to enter the meeting room.
Meeting room features
Once you are in the meeting room, a variety of options and features will be available. Most are controlled via icons in the meeting toolbar, which appears when you hover over the main window in the desktop client (and supported browsers), or when you touch the main window in the mobile client.
The desktop toolbar looks like this:

The mobile client toolbar looks like this:

See below for a description of the function of each toolbar icon.
| Icon(s) | Function |
|---|---|
  |
Disable/enable camera |
  |
Mute/unmute microphone |
  |
Mute/unmute speaker (mobile clients only) |
  |
Start/stop sharing screen/document/whiteboard |
 |
Show/hide meeting chat. In mobile clients, this icon displays at the upper right of the meeting window. |
 |
Show/hide participants. In mobile clients, this icon displays at the upper right of the meeting window. |
 |
Hang up; leave meeting. |
Customize your meeting settings
The () menu includes the following options for customizing your meeting experience:
- Show/hide device settings: Allows you to select your preferred camera and microphone and speakers; unavailable in the mobile app
- Show/hide meeting notes: Shows or hides a OneNote notebook for taking notes; unavailable in the mobile app
- Show meeting details: Includes an option to copy the meeting join information
- Enter/exit full screen mode
- Blur/don't blur my background: Useful if you don't want others to see details of your location
- Turn on/off live captions: Enables/disables voice-recognition based closed captions
- Keypad or Dialpad: This feature is not enabled at IU.
- Turn off/on incoming video: Saves bandwidth by turning off video of other users; unavailable for MacOS
- Put me on hold: Takes user out of meeting room temporarily; available in mobile apps only
- Start/stop recording
- Turn off/on incoming video: Disables/enables video feed from other participants; this is helpful for users with lower-bandwidth connections.
Manage participants
The participant list in Microsoft Teams offers several controls for managing the participants in a meeting, including the ability to set default permissions for the meeting, mute all users, and change the settings of individual users.
Set default permissions
As a host, once you enter the meeting room you can set default permissions for other users. To do so:
- If the participant list is hidden, click the icon (
 ).
). - At the upper right of the participants panel, click .
- From the "More options" drop-down, select .
- A "Meeting options" page will open in your default browser. Use the options on this page to determine:
- Who can bypass the lobby (waiting room)
- Whether an announcement is made when users join or leave the meeting
- Who can present
Manage individual users
To mute, remove, or change the role of a specific user:
- If the participant list is hidden, click the icon (
 ).
). - Locate the desired user and click () or tap the name in the mobile client.
- Select the desired option from the menu:
- Mute/unmute participant: Toggles microphone off and on
- Remove participant: Removes participant from meeting room
- Pin/unpin video: Displays/stops displaying a user's video on screen regardless of who is talking.
- Make an attendee/presenter: Toggles user between attendee and presenter roles. Presenters have the same permissions as the meeting organizer. Attendees are limited to sending audio, video, and chat.
In the desktop client or browser, you can also mute/unmute and pin/unpin participants by clicking () in their video window.
Mute all participants
To mute everyone except yourself:
- If the participant list is hidden, click the icon (
 ).
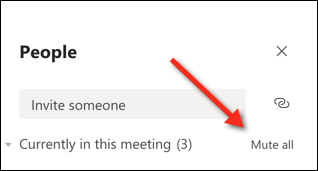
). - In the desktop client or browser, click ; in the mobile app, tap . You'll be asked to confirm in order to complete the action.
To prevent attendees from unmuting themselves:
- If the participant list is hidden, click the icon (
 ).
). - At the upper right of the participants panel, click .
- From the "More options" drop-down, select .
Invite users into the meeting room
To invite others into the meeting room, send them a link via email, or (for users already logged into Microsoft Teams) call them in Microsoft Teams.
To invite users by email:
- If the participant list is hidden, click the icon (
 ).
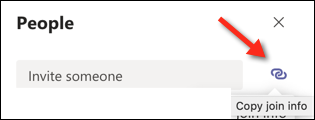
). - At the top of the participants window, to the right of the "Invite someone" box, click the icon:
- Open a new email message and paste the join info into the body of the message. Then add the recipients, subject, and additional explanatory text in the body.
- Send the message.
To invite users who are logged into Microsoft Teams:
- If the participant list is hidden, click the icon (
 ).
). - In the "Invite someone" box at the top of the list, start typing the name or username of the person you want to invite, and then select the person from the list of matching users.
- An attempt will be made to call out to the invited user in Microsoft Teams. If the user is logged in, they will be given the opportunity to accept or decline the meeting. If the user is not logged in, the user will show in the participant list as "unavailable" shortly after the call attempt.
Share your screen or a PowerPoint presentation
Four sharing options are available to meeting participants: Desktop, Window, PowerPoint, and Whiteboard. For detailed instructions on how to use the sharing features in meetings, see Share content in a meeting in Microsoft Teams and Use Whiteboard in Microsoft Teams.
Use chat for interaction and communication
- You must be logged in to Microsoft Teams to use chat. Meeting guests can not see or use the meeting chat tool.
- In desktop clients and browsers, the icon (
 ) is located in the meeting toolbar. In mobile clients, it is located at the top right of the screen.
 - A red dot at the upper right of the icon (
 ) icon means there are new messages in chat.
The chat tool in live meetings works much like posting to a team channel. In addition to posting messages to chat, you can send emojis and stickers, share files, and interact with third-party apps. To use chat:
- If chat is currently hidden in your meeting window, click the icon (
 ).
). - The chat window displays all prior chat activity for the current meeting room in chronological order. To post, enter a new message in the text box or select one of the tools beneath the text box to prepare your chat content. For instructions see Read or post to a channel and Other types of "post" interactions.
- When you are finished, click the icon (
 ) to post your message.
 - After the meeting ends, the chat transcript is archived in the channel feed with which the meeting was associated:

Create and manage breakout rooms
You can use the breakout rooms feature to group participants into smaller groups for discussions and activities. For instructions, see Use breakout rooms in Teams meetings.
Take meeting notes
The meeting notes feature allows participants to take meeting notes collaboratively. For instructions for using meeting notes, see Take meeting notes in Microsoft Teams.
Work with meeting recordings
You can record video, audio, and screen-sharing activity in Microsoft Teams. The recording is saved to Microsoft Stream (on SharePoint), a cloud-based video management service similar to Kaltura.
Record a meeting and share the recording
Any logged-in user can start a recording in the meeting room. For step-by-step instructions for how to record a meeting and share the recording, see:
Add captions to a recording
To add auto-generated or manually prepared captions to a video:
- Locate the recording in the channel feed.
- Open the () menu and select . A browser window will open the "Details" page for your video in Microsoft Stream (on SharePoint).
- On the "Details" page, open the () menu and select .
- On the "Video Details" screen, under "Video Language", select the original language for the video.
- Go to and choose , and then choose one of the following:
- Check to generate captions using speech recognition (English, Chinese, French, German, Italian, Japanese, Portuguese, and Spanish languages are currently supported for autogenerated captions), OR
- Select and browse for or drag a manually generated captions file to the upload screen. Then, click to upload the file.
- At the top of the "Video Details" screen, click to save your changes.
For more about working with captions in Stream, see Generate automatic captions and a transcript for your Microsoft Stream videos and Add subtitles or captions to your Microsoft Stream video.
Learn more and get help
To learn more about Microsoft Teams, Microsoft Teams meetings, and Microsoft Stream (on SharePoint), including features not covered here, see:
This is document bfaw in the Knowledge Base.
Last modified on 2021-10-05 16:56:22.