Download and edit captions or transcripts in Kaltura
On this page:
Overview
Creation of closed captioning for media is now available directly in the Kaltura interface. Fully automatic (mechanical) captions will be created by default for any new media loaded into Kaltura. You may order mechanical captions for existing content without a fee. For a fee, you may order more accurate, human-edited (professional) captions.
- Mechanically generated captions are not of sufficient quality to be suitable for the hearing impaired and should not be used for this purpose. They are intended to be a base for creating accurate captions via the captions editor and to facilitate search, interactive transcripts, and other features. For more, see Edit captions.
- You'll need to remove captions before trimming the video; see Trim a video in Kaltura. Be sure to do all necessary trimming before ordering professional captions.
Order captions
Professional fidelity captions are not free. If you do not have an existing relationship with the captioning service, contact atac@iu.edu to set up an account. For more, see About the Kaltura REACH captioning service.
Download transcripts
- Log into Kaltura.
- Select your name at the top right, and then select .

- Select the media for which you want to download a transcript.
- Just below the media, you will find the transcription widget toolbar. Select the icon to download the transcription file.
Download caption files
- Log into Kaltura.
- Select your name at the top right, and then select (see Download transcripts).
- Next to the media for which you want to download caption files, select , and then select from the drop-down menu.
- Just below the media, select .
- Under the "Captions" section, select the icon next to the caption file you want to download. It will be in the SRT (SubRip subtitle) format.
Edit captions
- Log into Kaltura.
- Select your name at the top right, and then select (see Download transcripts).
- Select the media for which you want to edit captions.
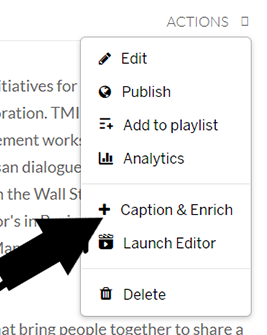
- Select the drop-down menu, and then select .

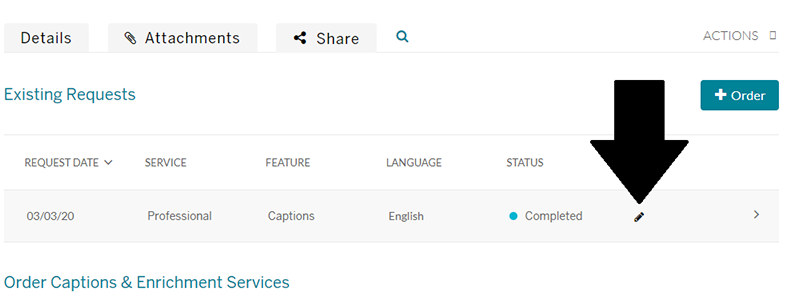
- The resulting table will display one row for each of the recording's caption tracks. The icon is displayed for all completed captions. Select in the right-most column to edit the desired captions.

- The caption editor will open. Edit the desired caption in the text field at the center of the page.

- To edit the timestamp of each line, select the desired timestamp to modify the time. The editor will highlight any overlapping time.

- To search, enter your text in the "Search in captions" box.

- To find and replace text:
- Enter your search term in the "Search in captions" box (see the search step, above).
- Enter your replacement term in the "Replace with" box.

- Select .

- To add a speaker ID:
- Select the rows you want a speaker added to.
- Enter your speaker ID in the "Add speaker to selected items" box.

- Select .

- When you are finished making edits, select .
Learn more
For help, contact your campus Support Center.
Related documents
This is document adhr in the Knowledge Base.
Last modified on 2024-06-05 13:19:17.