ARCHIVED: Elevating attendee permissions or user roles in Adobe Connect
Adobe Connect, IU's previous web collaboration and conferencing system, became read-only on August 31, 2017, and was fully retired on December 28, 2017. After a comprehensive pilot evaluation, Zoom was selected as its replacement.
UITS converted Adobe Connect recordings to MP4 format, but Adobe Presenter files were not automatically converted. UITS offers a content migration service for faculty who need assistance moving Presenter content to other platforms. To take advantage of this service, complete the Adobe Presenter Migration Support form.
If you are the Host of an Adobe Connect meeting, you may choose to grant meeting attendees additional permissions or promote them to different user roles. For more about roles and corresponding permissions, see ARCHIVED: About user roles in Adobe Connect.
By default, meeting attendees who join your Connect room as guests will be assigned Participant status. Participants can see and hear everything in the room, text chat, and change their status indicators, but they don't have permission to make changes to the room or share their screen, camera, or microphone.
On this page:
Elevating attendee permissions
Granting specific permissions to an individual attendee
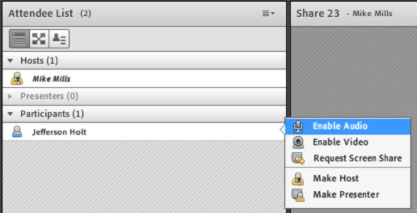
To elevate the permissions of an individual Connect meeting attendee, join your Connect meeting room, and then hover over the Participant's name in the Attendee List pod. From the menu that appears, select one of the elevated permissions: (microphone), (web camera), or :

Granting specific permissions to all attendees
Microphone use
To give all meeting attendees microphone use rights, join your Connect room, and then, from the menu, select .
This setting is not saved, so you'll need to reset it at the beginning of every meeting session if desired.
Web camera use
To give all meeting attendees web camera use rights, join your Connect room, click the arrow next to the camera icon on the tool bar, and choose .
This setting is not saved, so you'll need to reset it at the beginning of every meeting session if desired.
Promoting meeting attendees
Promoting an individual meeting attendee
If you want a Participant to be able to use a microphone, use a web camera, or share a document/desktop in your Connect room, you can simply promote that Participant to the Presenter role. To do so, join your Connect meeting room, and then hover over the Participant's name in the Attendee List pod. From the menu that appears, select .
Promoting all meeting attendees
If you'd like all meeting Participants to be able to use their microphones, use their web cameras, or share their documents or desktops in your Connect room, you can promote all of them to the Presenter role. To do so, join your Connect meeting room, go to the menu, and choose . Then, click .
For more, see the ARCHIVED: Adobe Connect menu.
For help, contact your campus Support Center.
This is document bfon in the Knowledge Base.
Last modified on 2018-01-18 17:23:59.