ARCHIVED: Configuring your Adobe Connect meeting
Adobe Connect, IU's previous web collaboration and conferencing system, became read-only on August 31, 2017, and was fully retired on December 28, 2017. After a comprehensive pilot evaluation, Zoom was selected as its replacement.
UITS converted Adobe Connect recordings to MP4 format, but Adobe Presenter files were not automatically converted. UITS offers a content migration service for faculty who need assistance moving Presenter content to other platforms. To take advantage of this service, complete the Adobe Presenter Migration Support form.
The Adobe Connect user interface is customizable so that you can optimally configure your Connect room to meet your specific needs.
On this page:
Pods
Each layout in a Connect meeting is made up of a series of pods. A pod is a building block that provides specific functionality in the meeting room. You can resize, add, and delete pods to create your own custom layouts in your Connect meeting rooms.
Anatomy of a pod
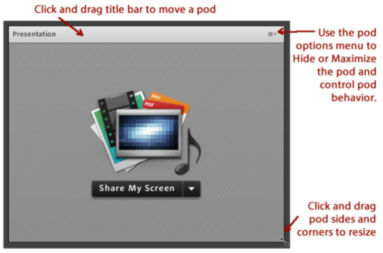
At the top right of every pod is a pod drop-down menu with options for controlling the pod:
- Click to remove a pod it from the current meeting room layout.
- Click to expand a pod to fill the entire area of the meeting room, covering all other active pods.
- Click to return a maximized pod to its normal size and position.
- To move a pod, click and drag the pod's title bar.
- To resize a pod, click and drag the pod's borders or corners.

Pods in the default layout
The pods included in the default layout are:
- Video: Broadcast video from your web camera. If you don't have a web camera or don't need to send video of yourself, you can hide this pod.
- Attendee List: View a list of meeting attendees and their statuses; grant additional permissions (e.g., microphone, camera, and screen sharing rights) to attendees. For more about adjusting permissions, see ARCHIVED: Elevating attendee permissions or user roles in Adobe Connect.
- Chat: Provide meeting attendees a way to give feedback and ask questions.
- Share: Upload a Microsoft PowerPoint slideshow or share your desktop with meeting participants. The Share pod supports PPT, PPTX, PDF, SWF, FLV, JPEG, MP3, and MP4 file types.
Additional pods
To add more pods to your Connect meeting room layout, select the desired pod type from the menu at the top of the meeting. Options include:
- Notes: Prepare notes ahead of time for attendees, or open a blank Notes pod to take notes for the group during your meeting.
- File Share: Upload files of any type for attendees to download from within your meeting.
- Poll: Create polls in advance for attendees to take during your meeting. You can choose to broadcast the poll results to the audience in real time, when the poll closes, or not at all.
Layout
You can have multiple layouts available in your room to accommodate the different stages of your meeting. As a Host, you'll see the two default layouts (Presenting and Videoconf) in the layout bar on the right side of the meeting room. You can edit these layouts or create new ones to suit your needs. Presenters and Participants in your room will not see the layout bar.
Toolbar
The toolbar at the top of the Connect meeting window gives you central control of your meeting settings, layouts, and pods. You can also quickly start and stop your web camera and microphone from the toolbar.
Preferences
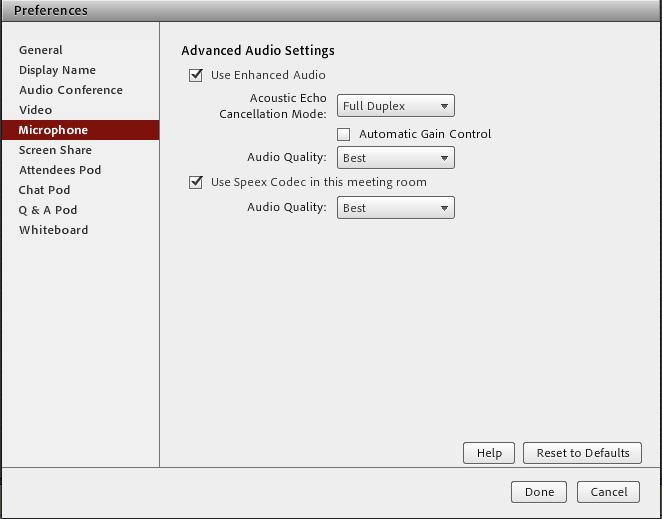
Adobe Connect allows you to review and adjust room-wide preferences to ensure your meeting runs successfully. To access these preferences, on the Connect toolbar, open the menu, and then select . Pay particular attention to the following preferences:
Microphone
- Always select .
- Set "Acoustic Echo Cancellation Mode:" to .
- Make sure is selected, to improve the likelihood that your meeting will be echo-free.

Video
These settings control the quality of your web camera video. Using the default settings is recommended.
Screen Share
These settings control the quality of your screen sharing. Begin by selecting quality and frame rate. If you encounter bandwidth issues (e.g., attendee complaints of audio cutting out or screen share freezing), try changing the screen sharing preferences to or . Sharing your screen at a reasonably low resolution (e.g., 1024x768) is strongly recommended.
To invite attendees to participate in your meeting, see ARCHIVED: Inviting participants to an Adobe Connect meeting.
For more, see the ARCHIVED: Adobe Connect menu.
For help, contact your campus Support Center.
This is document bfov in the Knowledge Base.
Last modified on 2018-01-18 17:29:04.