About the Canvas and Expand Provisioning API
On this page:
- Overview
- Request access
- Generate the data files
- Set up a REST client or application to access the API
- Coding resources
Overview
The Canvas and Expand Provisioning API lets schools and departments automate the process of provisioning IU Guest accounts and/or non-credit courses, sections, and enrollments in Canvas or Expand. Following are instructions for authenticating to the API and uploading provisioning data (as separate files or compressed into a single ZIP archive).
Request access
Access to the Canvas and Expand provisioning API is secured via OAUTH2. To request access, complete the request form. You will receive an immediate confirmation when you submit the request, but processing your request may take several days.
When a request is approved, a client ID and secret for the Canvas test environment is issued to the individual designated in the form, and a request for production credentials is initiated. Both sets of credentials will be transmitted via Secure Share. Keep these credentials in a secure location, and share them only with individuals who need them for developing code.
Generate the data files
Whether you are building your unit's provisioning files manually or via a custom application, file formats should conform to the guidelines in Data specification for provisioning IU guests and non-credit courses, sections, and enrollments in Canvas and Expand.
If you want to generate custom notifications to the new Guest accounts, prepare the message.properties file according to the guidelines in Send custom notifications to Canvas Guest account recipients. The API accepts individual CSV and message.properties files, or a single ZIP archive. (Unlike in the legacy DTP file drop service, you do not need to include a *.done file corresponding to each data file.)
Set up a REST client or application to access the API
The Canvas and Expand Provisioning API can be accessed via REST clients, such as Postman or Insomnia, or via a custom application, such as one your unit might develop. To make sure everything is working properly before you begin development, use a REST client to test your credentials and the file uploads. Information for setting up OAUTH2 and using the API POST call to upload files is provided below.
Set up OAUTH2
When configuring OAUTH2 in your REST client or application, use the following values:
| Field name | Value |
|---|---|
| Grant type | Client credentials |
| Access token URL (OAUTH test environment) |
|
| Access token URL (OAUTH production environment) |
|
| Client ID | Your unit's client ID |
| Client secret | Your unit's test or production client secret |
Issue the API call
The provisioning URLs and file upload endpoints are given in the tables below. To upload provisioning files with the API, issue a POST command using the base URL for the desired environment (test or production) and the endpoint that matches your upload type (separate CSV files or a single ZIP file).
For example, to upload a ZIP file to the Canvas test environment, issue the following command (replace group_name with the group name assigned to your unit in the LMS provisioning database):
https://lms-lti-3rdpartyprovisioning-stg.apps-test.iu.edu/rest/upload/group_name/zipBase URLs
| Environment | Base URL |
|---|---|
| Canvas beta (iu.beta.instructure.com) | |
| Canvas test (iu.test.instructure.com) | |
| Canvas production (iu.instructure.com) | |
Endpoints
For the endpoints in the table below, replace base_url with the appropriate base URL (from the "Base URLs" table above) and group_name with the group name assigned to your unit in the LMS provisioning database.
| Upload type | Endpoint |
|---|---|
| Individual CSV files | |
| Single ZIP file | |
Format the body of the API call
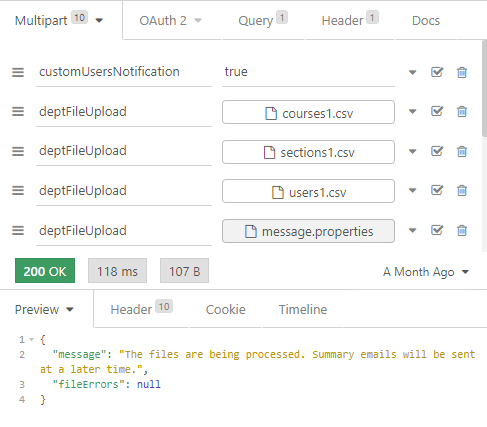
Format the body of the API call as a multipart form. The following name/value pairs are supported:
| Name | Type | Value | Notes |
|---|---|---|---|
customUsersNotification |
Text | true |
To send a custom notification along with your users.csv file, include customUsersNotification and true in the multipart form. Your upload must include a message.properties file. |
deptFileUpload |
File | File name | When uploading individual files, include a separate deptFileUpload entry for each file name. ZIP files require only one entry. |
Results messages
A successful transmission will return the following status code and message:
HTTP 200 OK
  {
    "message": "The files are being processed. Summary emails will be sent at a later time.",
    "fileErrors": null
  }
A failed transmission will return the following status code and message:
HTTP 400 Bad Request
  {
    "message": "No files to process",
    "fileErrors": null
  }
Example
The following screenshot illustrates the multipart form configuration for individual files in the Insomnia REST client:

Coding resources
For general information on coding API POST requests with a multipart form body, see:
- Python:
- PHP:
- Java:
- NodeJS:
- Windows ASP.NET
This is document bgxp in the Knowledge Base.
Last modified on 2023-07-18 14:38:46.