ARCHIVED: Republishing Adobe Presenter files as MP4 videos with Office Mix
At Indiana University, the Adobe Connect web collaboration and conferencing system became read-only on September 1, 2017. During the read-only phase, you can access and download previously created recordings and content, but cannot conduct live meetings or create new recordings. If you used Adobe Connect at IU, you should take steps to preserve any archived recordings you want to keep by December 28, 2017, after which the system will be fully decommissioned. For more, see ARCHIVED: About the Adobe Connect retirement.
After downloading Adobe Presenter files from the Adobe Connect server, you have several options for converting and sharing them in Canvas (for a description of each option, see ARCHIVED: Options for publishing Adobe Presenter files in Canvas at IU). For presentations that don't include interactive content (e.g., questions, links, attachments), UITS recommends using ARCHIVED: Office Mix to convert them to MP4 format, a widely accepted standard for storing and streaming audio and video. MP4 videos uploaded to Kaltura are automatically closed captioned and optimized for viewing on multiple devices.
On this page:
- Before you begin
- Download Presenter files from Connect
- Load and export the presentation with Adobe Presenter
- Drag MP3 audio files into slides
- Export the presentation to MP4
- Upload the MP4 file to Kaltura
Before you begin
Before downloading and working with your Adobe Presenter files, you'll need the following Microsoft PowerPoint add-ins:
- Adobe Presenter 10: If it's not already installed, download Adobe Presenter from IUware. Make sure you uninstall any previous versions first. For more, see the Adobe Presenter 10 Release Notes.
- Office Mix: For detailed instructions on how to download and install Office Mix, see ARCHIVED: About Office Mix (Retired).
Download Presenter files from Connect
If you published your Presenter content to the Adobe Connect server, you'll need to download the files to your computer. To do so:
- Log into Adobe Connect with your IU username and passphrase.
- In the top horizontal menu, click . You should be taken to your personal content folder (
My Content) where your Presenter files are stored. If you created subfolders underMy Content, your presentations may be in a subfolder. - Locate the presentation you want to download and click the hyperlinked recording title.
- From the content menu for the selected item, click .
- Under the heading "Download Source File(s)", right-click each file (the
.pptxor.pptfile and the.zipfile) and save them to your computer. - Locate the files on your computer. Right-click the file with the
.zipextension and choose to unzip it. - In the same folder as the files, create a new folder and name it
Presenter Files.
Load and export the presentation with Adobe Presenter
After downloading a Presenter file from Connect, link the audio file (PPCX) created by Presenter with the PowerPoint file (PPTX) and export separate audio files for each slide:
- Open Microsoft PowerPoint and load the
.pptor.pptxfile you downloaded in the previous section. - From the menu, choose . Under "Save as type", select . Make sure the extension is
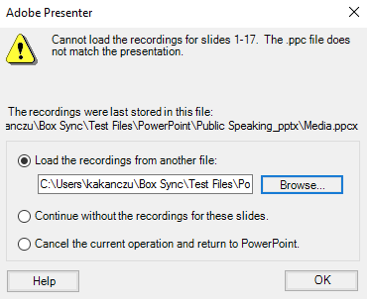
.pptx, not.ppt. Save the file with the same name and location as the original. - You may see a warning prompting you to locate the
.ppcfile:
- Click . Click and open the folder that was created when you unzipped the file in the previous section. The folder should have the same name as the presentation; open the folder beneath it (with name ending in
_pptx). - Open the file named
ppcxand click . The link between the presentation and the audio files will be saved.
- Click . Click and open the folder that was created when you unzipped the file in the previous section. The folder should have the same name as the presentation; open the folder beneath it (with name ending in
- In the PowerPoint ribbon, select .
- In the Adobe Presenter ribbon, click .
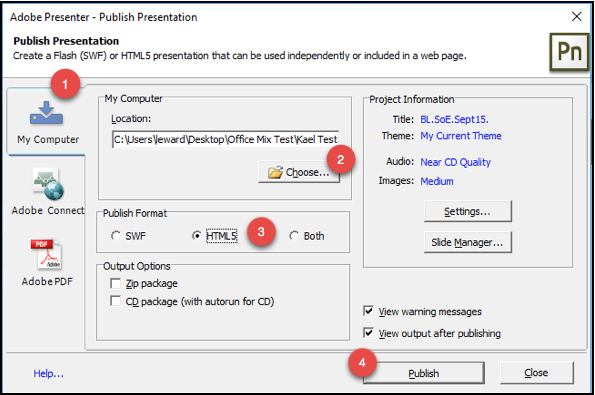
- In the "Publish Presentation" pop-up:
- Select (1) as the destination.
- Under "Location:", click (2) and navigate to the "Presenter Files" folder you created in the previous section.
- Under "Publish Format", select (3).
- Click (4). Depending on the size of the presentation, this could take 5 to 10 minutes. A progress bar will display the status of the export. The export process will create a separate MP3 audio file for each slide.

Drag MP3 audio files into slides
Associate each MP3 audio file with the corresponding slide by dragging the audio file onto the slide:
- In Windows, open the
Presenter Filesfolder where you published the presentation in the previous section. - Inside the
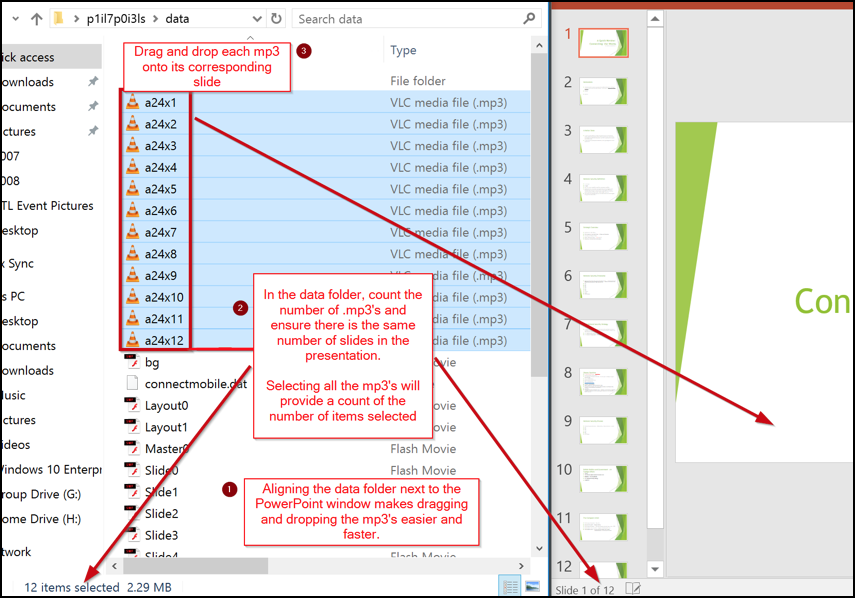
Presenter Filesfolder, open theDatafolder. You will see a collection of sequentially numbered MP3 audio files; there should be one MP3 file per slide in the presentation. - Arrange the windows on your desktop so that the folder containing the MP3 and PowerPoint files are both visible and next to one another.
- Drag and drop each MP3 file onto the corresponding PowerPoint slide. For example, drag the file named
a24x1.mp3onto slide 1,a24x2.mp3onto slide 2, and so on. Save the PowerPoint file periodically to ensure you don't lose your work.Notes:- The exact position does not matter as the speaker icon will not display in the exported video. However, dragging and dropping to the same location can make the repetitive steps easier.
- Under most circumstances, there should be one audio per slide. However, if you didn't record audio for some slides, there will be more slides than audio and the numbers in the
.mp3filenames will not match the slide numbers. In such cases, you'll need to review the original presentation to determine which slides should not have audio. Look for slides with a play time of 00:05 (5 seconds). This is the default play time for slides that don't have a recording.

- After dragging and dropping onto a slide, check to ensure there is a speaker icon and a play button on the slide.
- When you are finished dragging audio files onto slides, save the PowerPoint file.
Export the presentation to MP4
After placing the audio files on the slides, you can use Office Mix to export the presentation to MP4 video. To export the file:
- In the PowerPoint ribbon, click .
- In the Mix ribbon, click .
- A sidebar will open on the right side. Under "Video size", choose a quality level. or are both acceptable quality levels. Note that full HD will take longer to publish.
- Under "Under seconds spent on each slide", enter a default duration for slides without audio.
- Click to save the file.
- Navigate to the location where you want to save the file; accept the default filename or create a new one. Click . Note the location where the file is saved.
- To view the progress of the export, find the status bar at the bottom of the PowerPoint window. The sidebar on the right does not give an accurate indication of progress.
- When the export is complete, you can upload the file to Kaltura.
Upload the MP4 file to Kaltura
You can upload your presentation to Kaltura, IU's video storage and delivery platform, via either the Kaltura MediaSpace or the Kaltura tools in Canvas. For instructions on how to upload videos to MediaSpace, see Upload media to Kaltura MediaSpace.
For instructions on how to upload videos to Kaltura with the Kaltura tools in Canvas, see Upload and share video in Canvas with Kaltura. For the most efficient way to upload and share with your Canvas class, see Using the Embed Kaltura Media tool in the Canvas rich content editor.
This is document aoqb in the Knowledge Base.
Last modified on 2018-01-18 17:37:19.