Download, install, and configure ThinLinc Client to use Research Desktop (RED) at IU
On this page:
- Before you begin
- Download and install ThinLinc Client
- Configure ThinLinc Client options
- Connect to RED
- Logging out versus disconnecting your session
- Get help
Before you begin
To use Indiana University's Research Desktop (RED), you need an IU research computing account on Quartz and a device enrolled with IU's Two-Step Login (Duo) service. For help with Duo, see Get started with Two-Step Login (Duo) at IU and Help for Two-Step Login (Duo).
Download and install ThinLinc Client
Download ThinLinc Client for Windows, macOS, or Linux from ThinLinc downloads.
Install ThinLinc Client on your personal computer as you would any other application. If you need help, refer to the platform-specific installation instructions in Chapter 8 of Cendio's ThinLinc Administrator's Guide.
Once ThinLinc Client is installed on your personal computer, launching the application opens the ThinLinc Client login window:
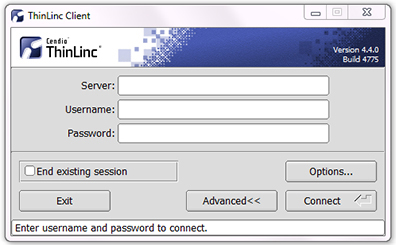
ThinLinc Client login window
Configure ThinLinc Client options
Before you log into the Research Desktop with ThinLinc Client, you'll need to configure some ThinLinc Client settings.
In the ThinLinc Client login window, select to open the "ThinLinc Client Options" window. (If you don't see the button, select to expand the login window.)
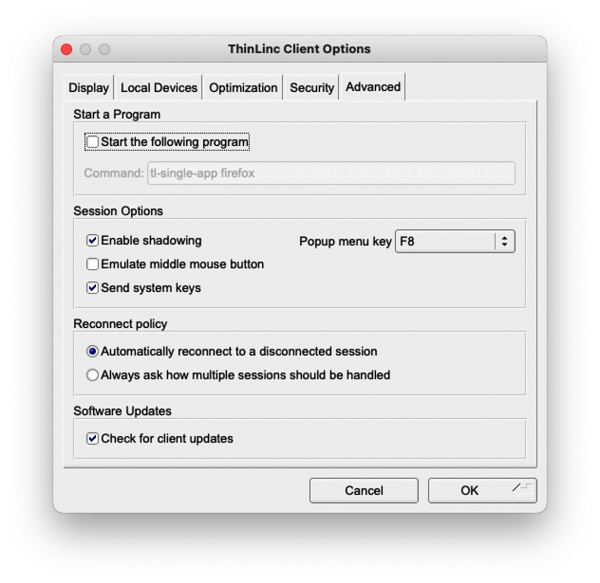
ThinLinc Client Options window
Use the following instructions to set up ThinLinc Client for use with RED. For supplementary information, see Client configuration in the Cendio ThinLinc Administrator's Guide. When you are finished configuring options, select to return to the ThinLinc Client login window, and then refer to the instructions below to connect to RED.
Display options
In the "ThinLinc Client Options" window, on the tab, you can choose a display option. The default display option is . Normally, the and options are the most useful.
UITS recommends not using the or options, because they may cause unexpected display problems.
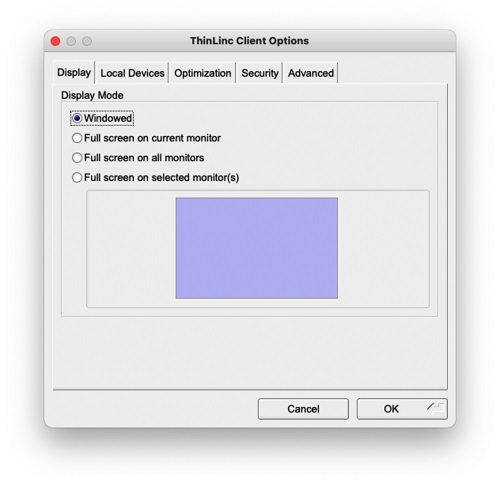
ThinLinc Client display options
Public key authentication
- The web client does not support public key authentication.
- SSH public key authentication is supported for researchers who submit the "SSH public key authentication to HPS systems" agreement, which requires you to agree to set a passphrase on your private key when generating your RSA key pair.
- ThinLinc Client does not support DSA keys. You must use an RSA key pair instead. For help generating and uploading RSA keys, see Setting up public key authentication using SSH on a Linux or macOS computer or use this form to contact the RED development team.
To set up public key authentication:
- In the "ThinLinc Client Options" window, on the tab, select .
- Select to return to the ThinLinc Client login window. You should now see a "Key" field in place of the "Password" field.
- In the "Key" field, type the path to your locally stored private key. Alternatively, select the (browse) option to locate and select the key on your local file system.
Export local drives and directories
If you want to give your RED session access to drives and/or directories on your personal computer:
- In the "ThinLinc Client Options" window, on the tab, select , and then (next to it) select .
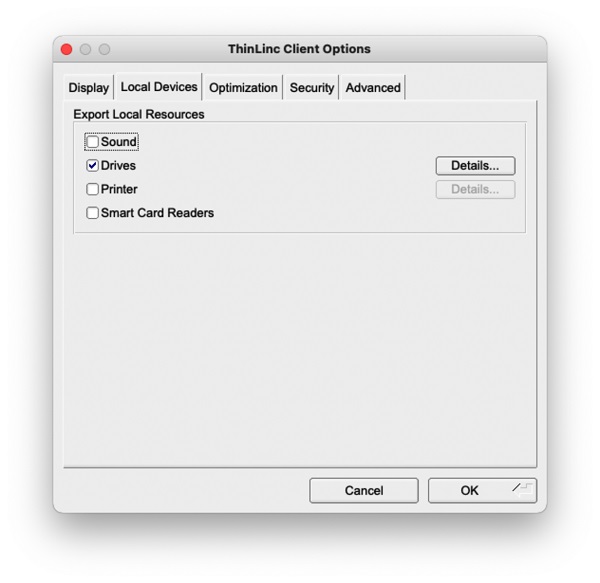
- In the "Export Local Drives" window, select , and then, under "Drive Options", select (file browser).
- Locate and select the desired local drive and directory, and then select .
Note:ThinLinc Client will not allow you to export the root directory (
/) of your local file system. - Under "Permission", use the drop-down to select or permissions for location indicated in the "Exported Path" field.
Note:
With permissions enabled locally, you can drag and drop files between your personal computer and your Quartz account. However, do not use drag and drop to copy large (multi-gigabyte) files.
- To select other directories to export, repeat this process. Otherwise, select to return to the "ThinLinc Client Options" window.
During your RED session, your exported directories will be accessible via the folder. For more about RED's graphical interface, see Research Desktop (RED) usage policies and interface features.
Connect to RED
The first time you launch ThinLinc client, the login window contains the following items by default:
- "Server" field (if you don't see the "Server" field, select to expand the login window)
- "Username" field (or "Name" field, depending on your system)
- "Password" field
- , , and buttons
- checkbox
- Status field (at the bottom; displays login status)

To connect to RED:
- In the "Server" field, enter
red.uits.iu.edu. - In the "Username" or "Name" field, enter your IU username.
- In the "Password" field, enter your IU passphrase.
Note:If you have public key authentication set up (see the instructions above), you should see a "Key" field in place of the "Password" field. Make sure the "Key" field points to your private key file, and then continue to the next step.
- Select .
- In the "Authentication" window, enter a Duo passcode, or enter
1to select a Duo Push, and then, select :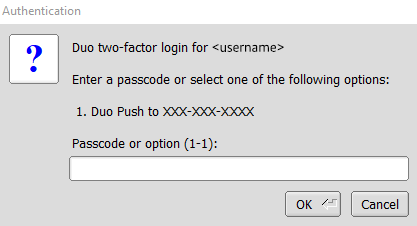
- The first time you connect to RED, ThinLinc Client will prompt you with a warning that the server's host key is not cached in the registry. Select to connect to RED.
As the connection is established, the field at the bottom of the login window will display details about the process. The RED window should open within a few seconds.
Logging out versus disconnecting your session
In a RED session, "logging out" and "disconnecting" are two different actions:
- Logging out: This closes any applications currently open in your RED session, terminates the session on the server, and closes the RED graphical desktop window. The next time you launch ThinLinc Client and select , a new RED session will be launched on the server.
To log out and terminate your current RED session, on the RED desktop, double-click .
- Disconnecting your session: This suspends any currently open applications and keeps your RED session running on the server, allowing you to reconnect to it later.
To disconnect (but not terminate) your current RED session, on the RED desktop, double-click . Alternatively, simply close the RED graphical desktop window.
Note:- Disconnected sessions remain active for up to seven days after your last login, but they are terminated automatically at the start of the monthly system maintenance window.
- If loss of internet connectivity causes your session to disconnect unexpectedly, your session will remain active on the server, and you can reconnect to it whenever you regain network connectivity (if it's within the aforementioned timeframe).
When you have an existing disconnected RED session, selecting in the ThinLinc Client login window will reconnect you automatically to your session, and all applications, terminals, and file browsers that were open when you disconnected will still be running.
Alternatively, to launch a new RED session instead, in the ThinLinc Client login window, select , and then select .
Get help
If you are using Research Desktop (RED) and need help or have questions, use this form to contact the Research Desktop development team directly.
This is document aput in the Knowledge Base.
Last modified on 2024-06-12 13:35:22.