Use Schedule Builder to plan your term of enrollment
On this page:
- Overview
- Use Schedule Builder
- Work with Schedule Builder results
- Validate your classes
- Set your enrollment options and save
- Finish enrolling for next semester
Overview
Indiana University's Interactive Graduation Planning System (iGPS) Schedule Builder helps you generate a workable class schedule each semester. It scans all available sections (classes) of the courses in your plan for the upcoming term, and provides you with options based on class offerings and your availability.
You can block out times when you cannot take classes, so the tool will return only classes that accommodate your schedule.
Schedule Builder does not register you for classes. When you find a good schedule, Schedule Builder will add classes to your Enrollment Shopping Cart, and then route you to the Student Center to complete your registration for the class sections you chose.
Use Schedule Builder
Before using Schedule Builder, use the iGPS Degree Maps tool to create an academic plan for completing your degree. Then, when your campus's schedule of classes for the upcoming term is available, and you are term-activated (in other words, eligible to register):
- Go to iGPS Plan. From full-plan view in iGPS, select the semester for which you want to enroll.
- If you copied course placeholders into your Plan from your Degree Map, make sure to resolve the placeholders to scheduled courses. You also may have already added specific class sections for courses directly to your shopping cart. Either way, make sure you have individual courses you want to take actually selected.
- You will see a button at the top of that specific term.
Note:
- If you do not see :
- You may not be term-activated. Contact your campus Registrar to confirm that you are term-activated for that semester.
- You may not have any courses. Make sure you have resolved all placeholders to scheduled courses.
- Your campus's schedule of classes may not be released yet.
- You cannot add courses while in Schedule Builder. Before going to Schedule Builder, add any courses for which you could potentially register to your iGPS Plan. You can always deselect a course if you don't want it included before your schedules are built. You can use the back button on your browser to return to your iGPS Plan. When viewing a single upcoming term, you can add additional courses that will then be reflected in Scheduler Builder once you navigate back to it.
To start building your schedule, select .
- If you do not see :
- You will be taken to the Schedule Builder landing page.
Note:
You will see an interrupt page the first time you access Schedule Builder that offers to show you the features and options available to you. If you skip this tutorial, you can return to the Tips for that page by selecting in the upper-right corner of the landing page.
On the Schedule Builder landing page:
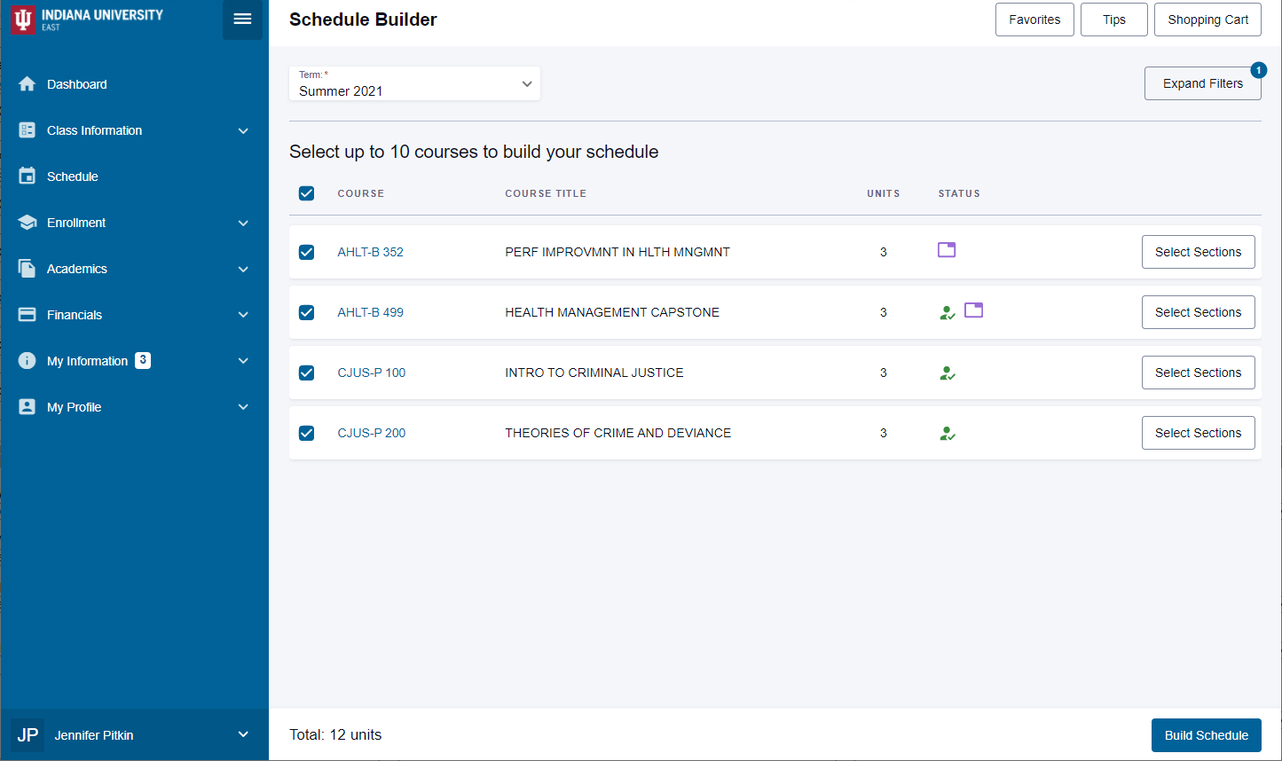
- All the class sections or courses you had in your iGPS Plan and Shopping Cart will be imported for you, along with any classes in which you are already enrolled for the upcoming term.
- Under the "Status" heading, icons are used to signify:
- Enrolled (
 ): Classes in which you are already enrolled for the next term
 - Plan (
 ): Classes in your iGPS Plan
 - Shopping Cart (
 ): Classes in your iGPS Shopping Cart
- Enrolled (
- In the top right, select to set filters and preferences for Scheduler Builder to use when constructing possible combinations of your courses:

- The "Class Status" global filter is set to by default, but you can change the status to include currently closed and/or waitlist sections, if needed.
- The "Instruction Mode" filter lets you select preferred modes of instruction:
- 100% Online All
- 76-99% Online Interactive
- Distance Synchronous Video
- Hybrid-Distance Video & Online
- Hybrid-On Campus & Online
- In Person
- Independent/Directed Study
- Internship/Practica
- The "Session" filter lets you select preferred sessions (for example, first or second eight-week session).
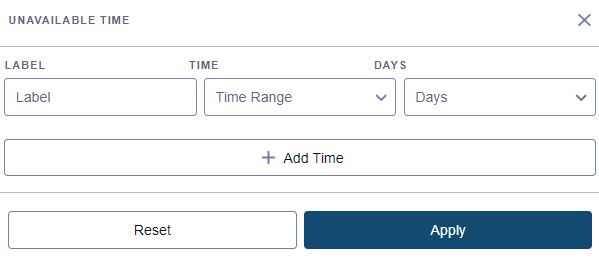
- The "Unavailable Time" filter lets you specify days and times when you know you are unavailable to take classes due to other obligations, such as your work schedule, family responsibilities, and other commitments.
 Note:
Note:- Adding unavailable time slots may cause some of your courses to become unavailable. When this happens, the system will warn you and identify any issues. If an unavailable time slot is optional, consider removing it. If you cannot find an available time for a class, you'll need to return to your iGPS Plan to choose a different course.
- After entering unavailable time slots, check to make sure that you've selected the set of courses that most interest you. Because Schedule Builder has pulled in your Plan, Shopping Cart, and enrolled courses, you may see courses that are back-up options for your first choice. Deselect any courses you do not want Schedule Builder to include.
- To select a specific class section that you want or need for a particular course, select for that course to see all sections offered for the upcoming term. Select only those sections that you want to see in your Schedule Builder results.
Optionally, when viewing sections available for a course, use the class-level filters at the top of the list (just below the course number and title) to select a specific instructor or topic (if offered).
- When you are finished setting filters and preferences, select .
If there are conflicts between course offerings and your unavailable time slots, you'll see pop-up notification explaining the conflict(s). If you have conflicts, resolve them by removing filters, or return to iGPS to adjust your Plan.
If you don't encounter any conflicts, you can proceed to the Work with your Schedule Builder results section of this document (below).
Work with your Schedule Builder results
Your Schedule Builder results will include all schedules possible for you:
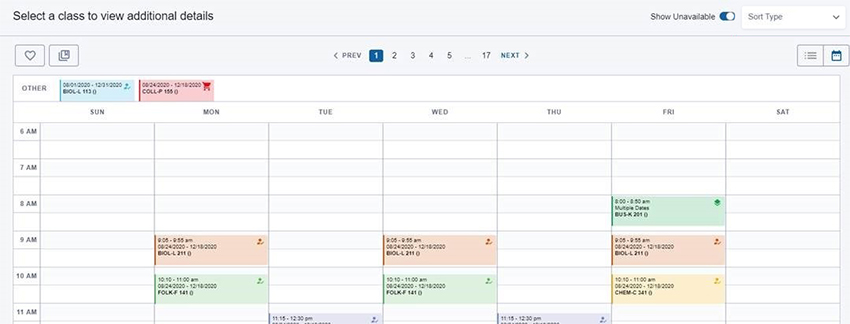
To sort through the results and find the schedule that's best for you:
- Use the drop-down (in the top right) to choose sort options:
- (fits in four or five days)
- (fits in two days)
Your Schedule Builder results will be re-sorted based on your selection, but the results will still contain the same number of schedules. You can see how many schedule options you have at the top of the calendar, between and .
- Toggle off if you don't want to see unavailable time blocks on your calendar. To remove them so that they no longer impact what schedules can be built, select at the top of the page.
- Select
 () to mark a schedule as a favorite so that it will be available to you if you need to log out of Schedule Builder and sign in again later.
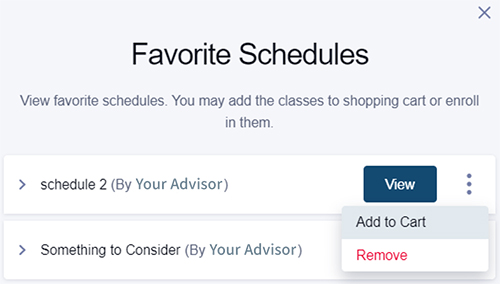
Your academic advisor also can mark schedules as favorites for you to consider. Select
 () before or after building schedules, and then look for your advisor's name along with the title(s) your advisor created:
- To help narrow down your top schedule choices, activate the "Compare" feature for two or more schedules, and then select
 () to see the compared schedules. Colors are used to represent each schedule; refer to the color key at the top of the calendar. Classes shared between schedules will display in gray and indicate the schedules that share them:
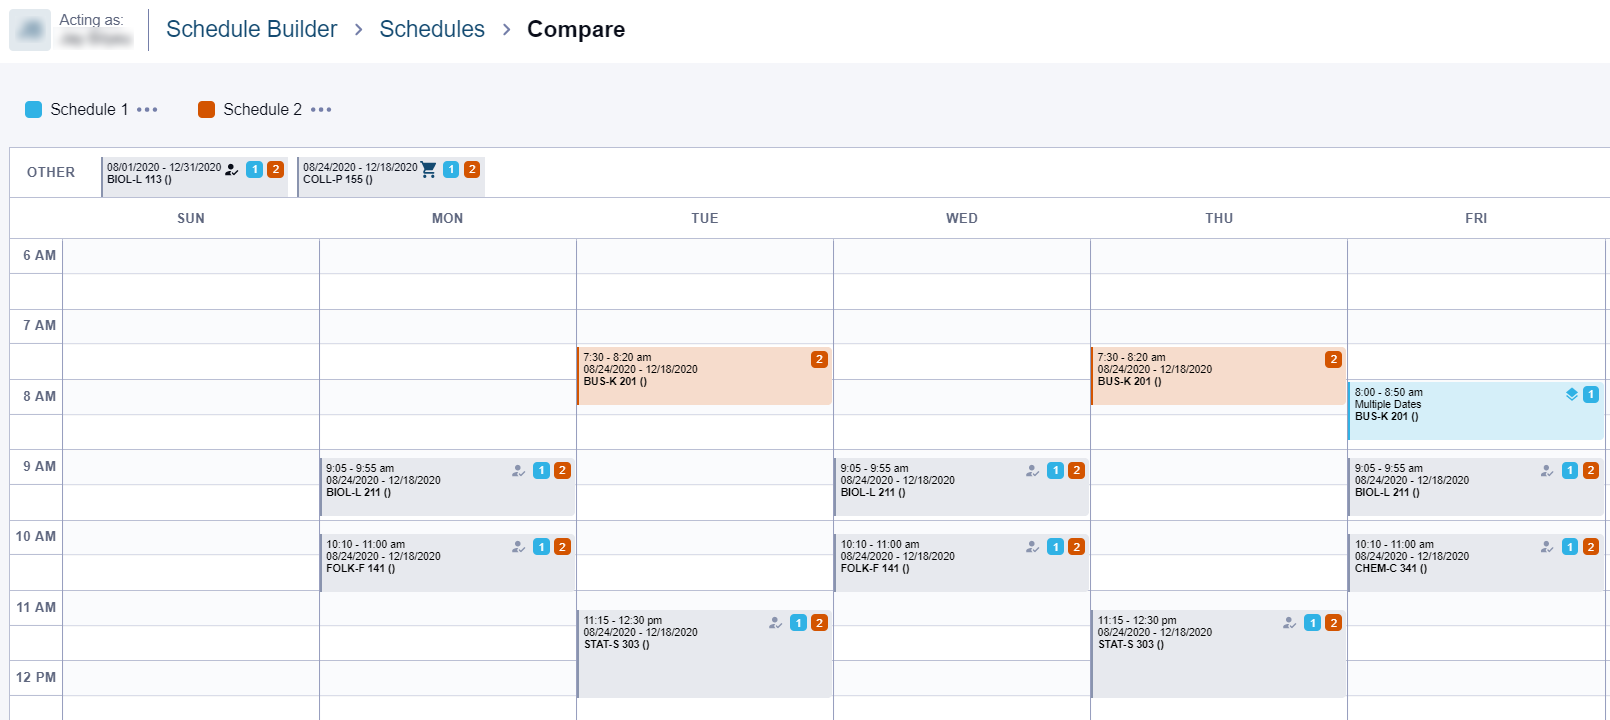
Remember to mark schedules you like best as "Favorites" so you can return to them at a later time, if needed.
- To see courses listed by day of the week, select
 (). In Calendar view, three fields will display for each class:
- Class meetings times
- Session date range (which is useful when you're trying to distinguish different sections or determine how your schedule may change over the course of the semester)
- Catalog subject, catalog number, and topic
Online classes with no meeting times will be listed in the "Other" section at the top of the page.
Select a class to see more details.
Classes with one-time events (such as specific exam dates or semester meetings) are identified on the calendar by "Multiple Dates" displaying where the session date range normally appears (and by the paper stack icon):
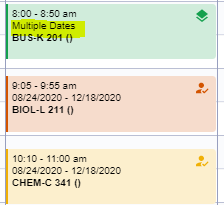
Select the class to view the details, including specific event dates:

The weekly calendar can give you a good idea of how a typical week will look if you choose these classes. At the bottom of the calendar, each class is listed with horizontal bars representing the weeks of the semester the class meets. This duration of class display can help you understand how your class schedule might change over the course of the semester:

- Select
 () to easily pin a course. If you identify a specific section as your top choice, you can pin it, and Schedule Builder will show you only the schedule options that include your pinned section.

Online classes with no meeting times will be listed in the "Other" section at the bottom of the page.
Select a class to see more details.
Validate your classes
When you narrow your options down to a single schedule, select , and the class sections for which you are not already registered will be listed for you to select for validation.
Schedule Builder will check that you are eligible to enroll in the class sections you selected, and will display an explanation of any validation issues it encounters. Although you can add classes with validation errors to your Shopping Cart, you will not be able to complete your enrollment if your schedule contains a class has that has a validation issue.
Set your enrollment options and save
From , select to set options for enrollment.
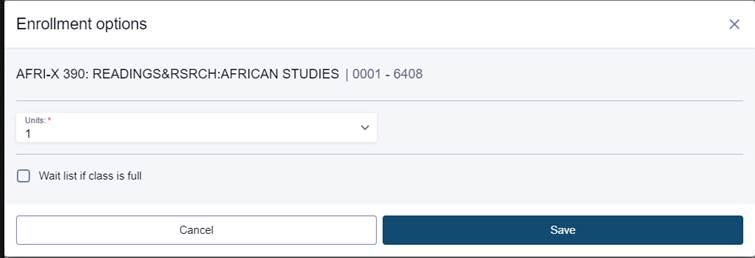
From here:
- If enrollment is full, you can add yourself to a waitlist.
- For variable credit classes (like internship or independent project credits), select the number of hours for which you are enrolling.
When all options have been saved for all classes, you will see a green checkmark, and the button will be enabled.
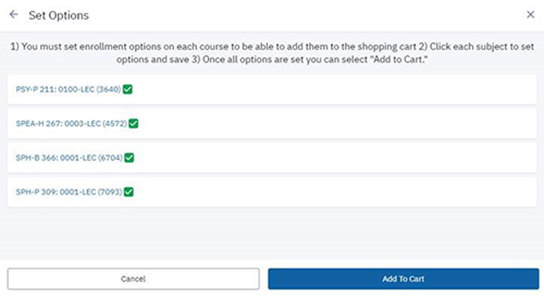
You will return to the Schedule screen. You should see a "Success" message telling you that your selected classes were added to you Shopping Cart.
Finish enrolling for next semester
To finish your enrollment, in the top right, select , which will move you to the Enrollment Shopping Cart page in the Student Center. Make sure you've selected the future term that you were adding classes to and not the current term, which will likely be empty at the time you are registering for the upcoming term. Because your classes are validated, you can mark the checkboxes in the Shopping Cart table, and then select .
You will see an Enrollment Results summary for all of the classes you wish to enroll in. If a class is not added to your schedule, the summary will identify it as an error and explain why it was left out. Furthermore, if you don't enroll in the class, it will remain in your Shopping Cart until you either resolve the offending issue or remove it.
To see your upcoming semester's schedule by day, week, or month, select near the top of your Shopping Cart. Once you see the calendar, navigate to the start of the next semester to view your future calendar schedule.
This is document aqcq in the Knowledge Base.
Last modified on 2024-06-14 15:08:47.