ARCHIVED: Considerations for new users of Adobe Connect
Adobe Connect, IU's previous web collaboration and conferencing system, became read-only on August 31, 2017, and was fully retired on December 28, 2017. After a comprehensive pilot evaluation, Zoom was selected as its replacement.
UITS converted Adobe Connect recordings to MP4 format, but Adobe Presenter files were not automatically converted. UITS offers a content migration service for faculty who need assistance moving Presenter content to other platforms. To take advantage of this service, complete the Adobe Presenter Migration Support form.
On this page:
- Connectivity and bandwidth
- Camera and voice configuration
- User roles
- Meeting and recording links (URLs)
- Privacy settings
Connectivity and bandwidth
For information about resolving connectivity issues and adjusting bandwidth, see ARCHIVED: Testing connectivity in Adobe Connect.
Camera and voice configuration
For instructions on configuring your audio device(s) using the Audio Setup Wizard, see ARCHIVED: Using audio in an Adobe Connect meeting. For instructions on using video, see ARCHIVED: Using video in an Adobe Connect meeting. To learn about screen sharing, see ARCHIVED: Sharing your screen in Adobe Connect.
By default, only users who have Presenter or Host roles can use the Voice and Camera pods. The meeting Host or Presenter can grant these rights to participants; see ARCHIVED: Elevating attendee permissions or user roles in Adobe Connect.
Troubleshooting tips
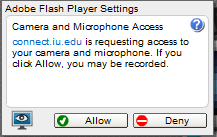
- In the Audio Setup Wizard, the first time you select or click , you will likely see the
following pop-up window:

Click to let Adobe Connect access your camera and microphone. You may need to log out of Adobe Connect and then log back in to retain this setting.
If you accidentally click :
- Close your Adobe Connect meeting, and go to your Flash Player settings. (In Windows, click ; in OS X, select and then .)
- Select and then click .
- Find "connect.iu.edu" on the list and click .
- Close the settings window, and then reopen your Adobe Connect meeting and rerun the Audio Setup Wizard.
- Audio configuration also relies on the device audio settings
within the host operating system and browser. To troubleshoot audio
issues on your computer, try the following:
Windows:
- Use the Windows Volume Mixer to check that your device, browser, and Flash Player volume are set so you can hear them.
- See Tips for fixing common sound problems from Microsoft Windows.
- See How to Troubleshoot Audio Issues in Windows 7 and Vista from Helpdesk Geek.
Mac OS X:
- See Troubleshooting issues with no audio from built-in speakers on Macs from Apple Support.
Chrome browser:
- You may need to adjust your browser settings so Connect can access your camera and microphone as described in Allow sites to access your camera and microphone from Chrome Help.
- Download the latest version of Adobe Flash Player. Be sure to uncheck any additional options (e.g., McAfee Security Scan Plus).
- For more suggestions, see the "Preferences" section of ARCHIVED: Configuring your Adobe Connect meeting.
For more extensive tips for troubleshooting audio and video issues, see the following:
- Manage audio within meetings from Adobe Help
- Video in meetings from Adobe Help
- Getting Started with Adobe Connect from the Adobe Connect User Community
User roles
See ARCHIVED: About user roles in Adobe Connect and ARCHIVED: Elevating attendee permissions or user roles in Adobe Connect.
Meeting and recording URLs
To retrieve a meeting URL, log into the Connect Manager, select the tab, and follow the link to your meeting.
To retrieve a recording URL, see ARCHIVED: Viewing and managing your Adobe Connect recordings.
Privacy settings
In Adobe Connect 7.5 and later, meetings are private by default. In previous versions, all meeting recordings were publicly accessible by default. This behavior is set by the Connect server software and is not adjustable. Because of this setting, meeting Hosts have to change how they make their meetings accessible.
If you are a meeting Host and want to make a meeting public, see ARCHIVED: Viewing and managing your Adobe Connect recordings. Only the creator/owner of the meeting can make this change. If you need to access a meeting recording and it is not public, contact the meeting Host and ask that the meeting be made public.
For more, see the ARCHIVED: Adobe Connect menu.
For help, contact your campus Support Center.
This is document bdvs in the Knowledge Base.
Last modified on 2018-01-18 17:18:39.